
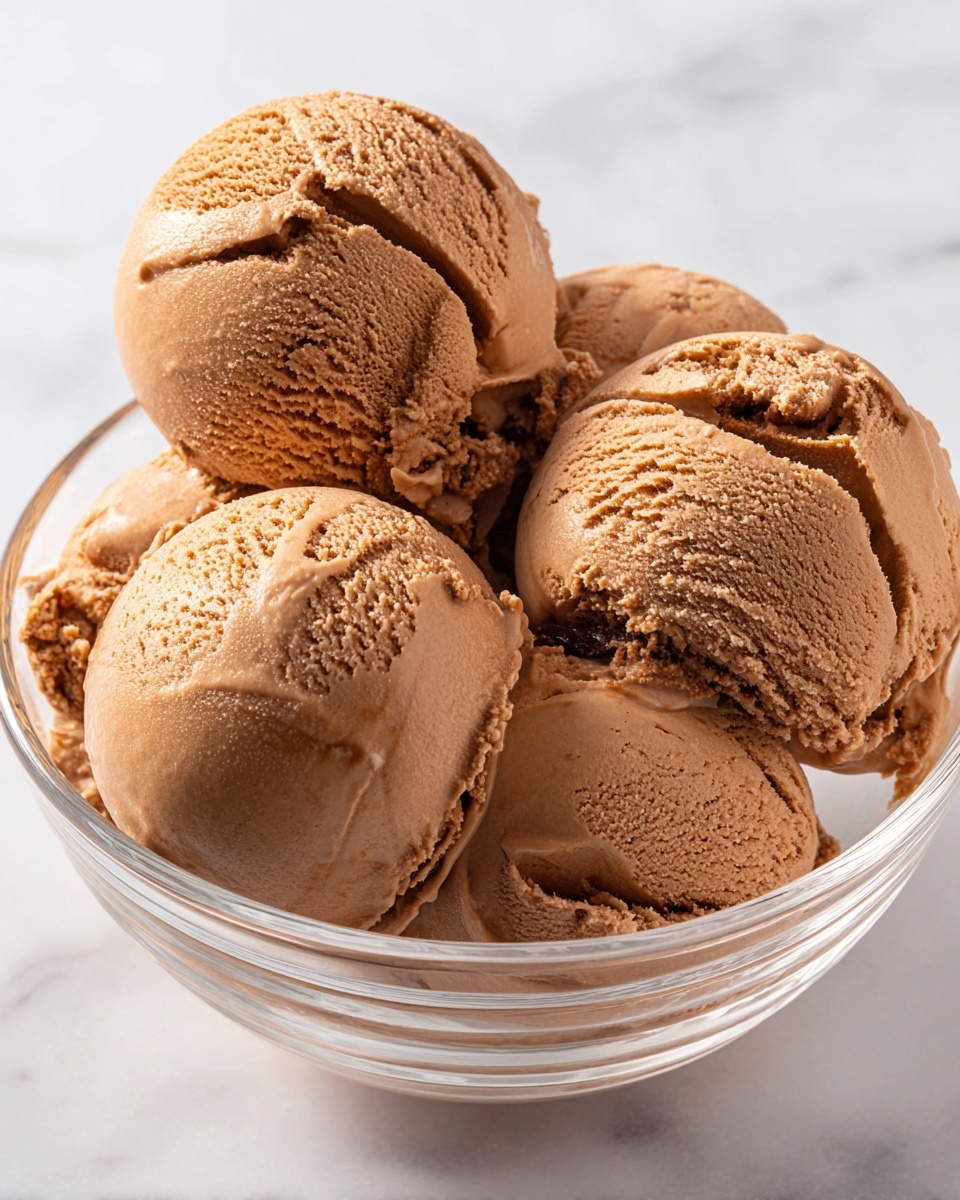
If you have a passion for rich, creamy desserts but need to avoid gluten, then you are absolutely going to adore this Gluten-Free Chocolate Peanut Butter Ice Cream Recipe. It perfectly balances the luscious depth of chocolate with the nutty warmth of peanut butter, all wrapped in a dreamy, coconut milk base that’s velvety and indulgent without a hint of gluten. Whether you’re making it for a special occasion or just treating yourself after a long day, this recipe feels like a cozy hug in every bite.
Ingredients You’ll Need
Gathering the right ingredients is as simple as it is essential. Each component plays a starring role, creating the perfect harmony of flavor, texture, and color in your ice cream. From creamy coconut milk that forms the silky base to the natural peanut butter that adds that irresistible nutty punch, every ingredient counts.
- 2 cups full-fat coconut milk: Provides a creamy, dairy-free base with a natural richness perfect for smooth texture.
- ½ cup creamy natural peanut butter, well-stirred: Adds that classic peanut butter flavor and creaminess right into the base.
- ½ cup coconut sugar (or substitute with maple syrup or honey): Sweetens the ice cream naturally while imparting a subtle caramel note.
- 4 tablespoons unsweetened cocoa powder: Delivers deep chocolate flavor and contributes to the ice cream’s beautiful dark color.
- 1 teaspoon pure vanilla extract: Enhances all the flavors and adds a hint of floral sweetness.
- ¼ teaspoon fine sea salt: Balances sweetness and intensifies the chocolate and peanut butter notes.
- ½ teaspoon xanthan gum: A gluten-free thickener that prevents ice crystals and ensures smoothness.
- 4 oz semi-sweet chocolate, chopped (gluten-free): Melts into the base creating a luscious, velvety chocolate foundation.
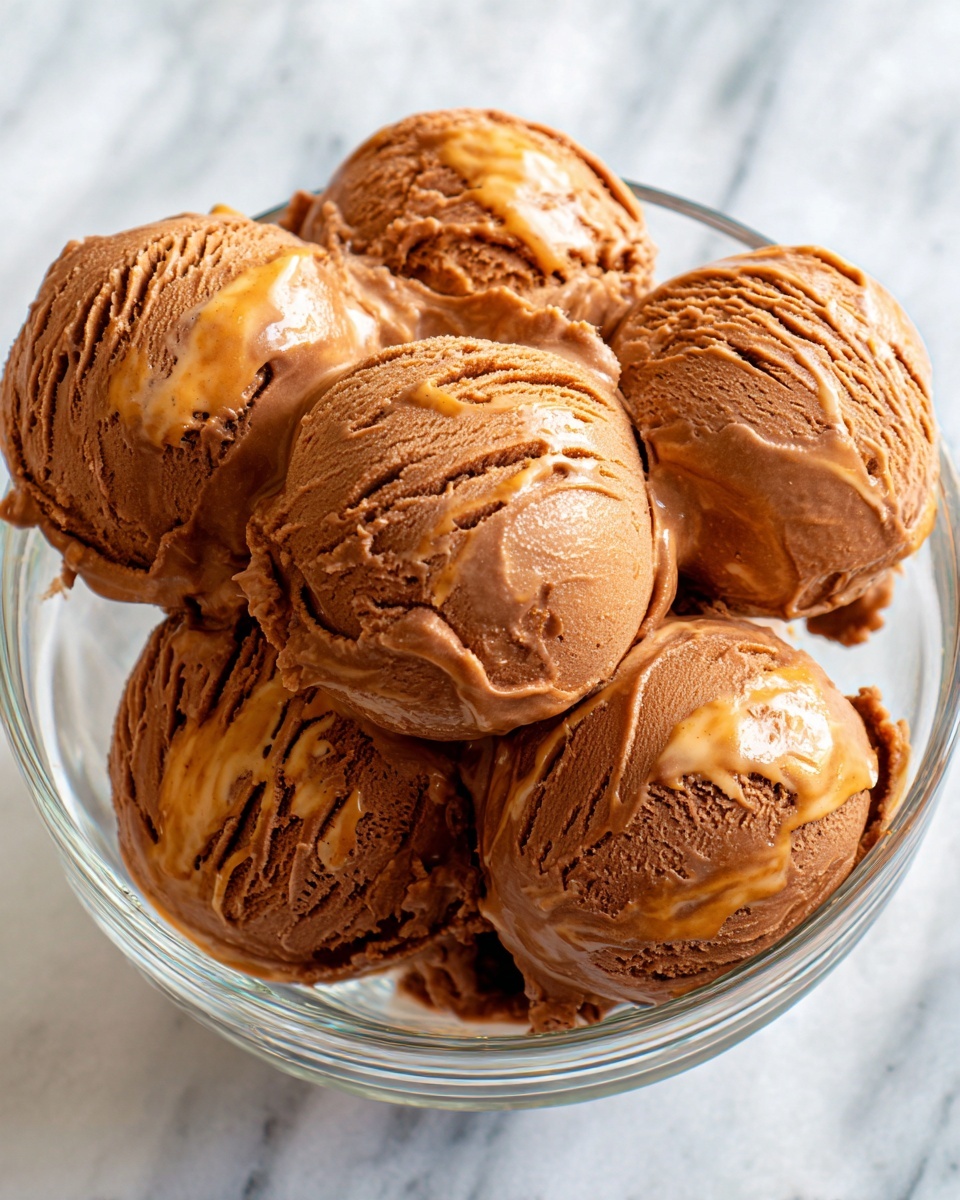
- ½ cup natural peanut butter (for the swirl): This peanut butter swirl spices up the texture with soft ribbon-like pockets of flavor throughout.
- 2 tablespoons maple syrup (for the swirl): Sweetens the peanut butter swirl for a perfect contrast.
- Pinch of salt (for the swirl): Balances the swirl and brings out the peanut butter’s natural nuttiness.
How to Make Gluten-Free Chocolate Peanut Butter Ice Cream Recipe
Step 1: Create the Chocolate Peanut Butter Base
Begin by combining coconut milk, peanut butter, coconut sugar, and cocoa powder in a medium saucepan. Heat gently while whisking until the mixture just starts to simmer. This is crucial to dissolve the cocoa powder fully, preventing a gritty texture later in your ice cream. Keep your eyes on the pot so nothing burns or sticks.
Step 2: Melt the Semi-Sweet Chocolate
Once the base simmers, remove it from heat and add chopped semi-sweet chocolate. Let it rest for a minute so the residual heat melts the chocolate smoothly. Then whisk everything until the mixture is silky and completely uniform in texture — this step builds the luxurious body of your ice cream.
Step 3: Add Flavor Enhancers and Thickener
Stir in the vanilla extract, sea salt, and xanthan gum until everything is fully incorporated with no lumps. Xanthan gum plays a quiet but critical role here, keeping your gluten-free ice cream from turning icy and grainy once frozen.
Step 4: Chill the Mixture
Transfer your chocolate peanut butter base to a bowl and cover with plastic wrap pressed directly onto the surface to avoid any skin from forming. Pop it into the fridge for at least four hours, or ideally overnight. Thorough chilling sets the stage for a creamier churn.
Step 5: Prepare the Peanut Butter Swirl
While your base chills, mix together the natural peanut butter, maple syrup, and a pinch of salt for the swirl. Refrigerate this mixture too, so it stays firm and ready to create those gorgeous ribbons of flavor once you assemble your ice cream.
Step 6: Churn the Ice Cream
Pour the cold base into your ice cream maker and churn following the manufacturer’s instructions. It usually takes 20 to 25 minutes for the mixture to reach a lovely soft-serve stage. The churning incorporates air, giving your Gluten-Free Chocolate Peanut Butter Ice Cream Recipe its light texture.
Step 7: Add the Peanut Butter Swirl
When churning is almost done, spoon half the ice cream into a freezer-safe container, then add half the peanut butter swirl. Repeat with the remaining layers and gently swirl together using a knife in a figure-eight motion. Be gentle here to preserve that beautiful marbling of flavors.
Step 8: Freeze Until Firm
Cover and freeze your ice cream for at least four hours until it’s fully set. If you don’t have an ice cream maker, use the no-churn method by freezing the combined mixture and whisking every 30 to 45 minutes to break up ice crystals, folding in the peanut butter swirl during the final stir.
How to Serve Gluten-Free Chocolate Peanut Butter Ice Cream Recipe
Garnishes
Garnishing elevates your ice cream experience with a little extra flair and flavor. Consider a handful of crushed roasted peanuts for crunch, a drizzle of melted chocolate or peanut butter, or even a sprinkle of flaky sea salt to heighten the taste sensations.
Side Dishes
This ice cream pairs beautifully with warm desserts such as gluten-free brownies, apple crisps, or simply alongside fresh berries to add a refreshing contrast to the richness.
Creative Ways to Present
Looking to impress? Serve scoops in mini waffle cones, or swirl the ice cream into parfait glasses layered with gluten-free granola and chopped nuts. For parties, freeze the ice cream in popsicle molds with extra peanut butter layers for a fun, handheld treat.
Make Ahead and Storage
Storing Leftovers
Once made, store any leftover ice cream in an airtight container to prevent freezer burn and unwanted ice crystals. Keep it tightly sealed and press a piece of parchment paper on top before closing the lid to maintain freshness.
Freezing
You can freeze this ice cream for up to two weeks while maintaining optimal flavor and texture. Longer storage may cause slight ice crystallization, but if stored properly, it will still be delicious.
Reheating
Since this is an ice cream, reheating is not applicable. However, letting the ice cream sit at room temperature for 5 to 10 minutes before scooping makes serving easier and enhances the creamy texture.
FAQs
Can I use other nut butters instead of peanut butter?
Absolutely! Almond butter or cashew butter can be substituted for natural peanut butter, but keep in mind the flavor profile will change accordingly. Just ensure your nut butter is smooth and well-stirred for the best swirl effect.
Is this recipe suitable for vegans?
Yes, it is! Using full-fat coconut milk and natural sweeteners like maple syrup makes this a great vegan option. Just double-check that the semi-sweet chocolate you choose is dairy-free and gluten-free.
What if I don’t have an ice cream maker?
No worries at all! You can use the no-churn freezing method described in the recipe to achieve a creamy texture without an ice cream maker. Just be prepared to stir the mixture regularly during freezing.
How does xanthan gum improve the ice cream texture?
Xanthan gum acts as a thickening agent that prevents ice crystals from forming, which can make ice cream icy and grainy. This is especially important in gluten-free recipes that don’t use traditional stabilizers.
Can I make this ice cream ahead for a party?
Definitely! You can prepare the base and peanut butter swirl a day ahead, chill overnight, then churn and freeze on the day of your event. This makes entertaining easier and allows the flavors to fully develop.
Final Thoughts
Making this Gluten-Free Chocolate Peanut Butter Ice Cream Recipe is such a delightful experience, especially knowing every spoonful is free from gluten yet rich with flavor. Whether you’re spoiling yourself or sharing with friends, this recipe delivers creamy, dreamy satisfaction from start to finish. I encourage you to dive in and whip up a batch—you’ll be glad you did!
Print
Gluten-Free Chocolate Peanut Butter Ice Cream Recipe
- Prep Time: 15 minutes
- Cook Time: 10 minutes
- Total Time: 4 hours 25 minutes
- Yield: 4 servings
- Category: Dessert
- Method: Churning with Ice Cream Maker
- Cuisine: American
- Diet: Gluten Free
Description
Enjoy a rich and creamy Gluten Free Chocolate Peanut Butter Ice Cream made with full-fat coconut milk and natural peanut butter. This homemade treat is sweetened with coconut sugar and enhanced with cocoa powder, vanilla, and a luscious peanut butter swirl, perfect for those seeking a gluten-free, dairy-free dessert with a smooth texture and indulgent flavor.
Ingredients
Ice Cream Base
- 2 cups full-fat coconut milk
- ½ cup creamy natural peanut butter, well-stirred
- ½ cup coconut sugar (or substitute with ½ cup maple syrup or honey)
- 4 tablespoons unsweetened cocoa powder
- 1 teaspoon pure vanilla extract
- ¼ teaspoon fine sea salt
- ½ teaspoon xanthan gum
- 4 oz semi-sweet chocolate, chopped (ensure it’s gluten-free)
Peanut Butter Swirl
- ½ cup natural peanut butter
- 2 tablespoons maple syrup
- Pinch of salt
Instructions
- Prepare the base: In a medium saucepan, combine 2 cups of full-fat coconut milk, ½ cup creamy natural peanut butter, ½ cup coconut sugar (or preferred sweetener), and 4 tablespoons unsweetened cocoa powder. Heat over medium heat while whisking continuously until the mixture begins to simmer, ensuring the cocoa dissolves completely without burning.
- Melt the chocolate: Remove the mixture from heat and stir in 4 oz chopped semi-sweet chocolate. Let it sit for one minute, then whisk until smooth, allowing residual heat to melt the chocolate fully for richness.
- Add flavorings and stabilizer: Stir in 1 teaspoon pure vanilla extract, ¼ teaspoon fine sea salt, and ½ teaspoon xanthan gum into the warm mixture. Whisk thoroughly to combine and eliminate lumps, which helps create a smooth, creamy ice cream texture without ice crystals.
- Chill the base: Transfer the mixture to a bowl and cover tightly with plastic wrap directly on the surface to prevent a skin. Refrigerate for at least 4 hours or overnight until completely cold.
- Prepare the peanut butter swirl: In a small bowl, mix ½ cup natural peanut butter, 2 tablespoons maple syrup, and a pinch of salt until smooth. Refrigerate until ready to use, to create distinct swirl ribbons in the ice cream.
- Churn the ice cream: Pour the chilled chocolate base into your ice cream maker and churn following manufacturer’s instructions, approx. 20-25 minutes until soft-serve consistency forms.
- Layer and swirl: In the last minute of churning, layer half of the ice cream into a freezer-safe container, dollop half the peanut butter swirl atop. Repeat layering remaining ice cream and peanut butter. Use a knife to gently swirl in a figure-eight motion without overmixing.
- Freeze until firm: Cover and freeze for at least 4 hours until fully set. Alternatively, use the no-churn method by freezing the mixture initially for 45 minutes, then vigorously whisking or beating every 30-45 minutes for 3-4 times, adding the peanut butter swirl on the final whisk.
Notes
- Ensure the semi-sweet chocolate is certified gluten-free to maintain the recipe’s gluten-free status.
- Xanthan gum is essential to achieve a creamy texture and prevent ice crystals; do not skip.
- For a dairy-free option, confirm all ingredients including peanut butter and chocolate are free from dairy.
- Sweetener substitutions such as maple syrup or honey work well but may slightly alter the flavor and texture.
- The chilling step improves texture and will make churning easier and yield better ice cream consistency.
- If you don’t have an ice cream maker, follow the no-churn instructions for a similar result.
- Swirling gently preserves visual contrast between the chocolate base and peanut butter ribbons.


