If you are craving a festive treat that’s as delightful to look at as it is to eat, this Milk Chocolate Stuffed Jack-O’-Lantern Cookies Recipe is absolutely perfect. These pumpkin-shaped cookies are irresistibly soft with a luscious milk chocolate center that oozes just right, combining seasonal charm and indulgence in every bite. The vibrant orange dough brings Halloween spirit to life, while the gooey chocolate inside adds a sweet surprise that will have everyone asking for seconds. Trust me, these cookies will be the star of your dessert table and a fun baking project to share with friends or family.
Ingredients You’ll Need
The beauty of this Milk Chocolate Stuffed Jack-O’-Lantern Cookies Recipe is how simple yet purposeful each ingredient is. From the buttery-rich dough to the vibrant orange coloring, every item has a role that guarantees flavor, texture, and visual appeal. Here’s exactly what you need to create this festive favorite:
- 2¾ cups all-purpose flour: The foundation for soft, tender cookies that hold their shape beautifully.
- ½ teaspoon baking powder: Helps the cookies rise just enough for a light texture.
- ½ teaspoon salt: Balances sweetness and enhances overall flavor.
- 1 cup unsalted butter (softened): Provides richness and a melt-in-your-mouth feel.
- 1 cup granulated sugar: Sweetens while contributing to the cookie’s lightness.
- 1 large egg: Binds the dough and adds tenderness.
- 1½ teaspoons vanilla extract: Adds warmth and depth to the flavor.
- ½ teaspoon almond extract (optional): Gives a subtle nutty note that complements pumpkin hues.
- Orange gel food coloring: Creates that vibrant pumpkin-orange color essential for the jack-o’-lantern look.
- ½ cup milk chocolate chips or squares: The star filling that melts to gooey perfection inside each cookie.
- 1 tablespoon heavy cream (optional): Helps melt the chocolate smoothly when necessary.
How to Make Milk Chocolate Stuffed Jack-O’-Lantern Cookies Recipe
Step 1: Mix the Dry Ingredients
Start by whisking together the flour, baking powder, and salt in a medium bowl. This ensures an even distribution of leavening and seasoning, setting you up for cookies with a consistent texture and balanced flavor.
Step 2: Cream Butter and Sugar
In a large bowl, beat the softened butter and sugar together until the mixture is light and fluffy. This key step introduces air into your dough, giving the cookies their tender crumb and just the right amount of rise.
Step 3: Add Egg and Extracts
Beat in the egg, vanilla extract, and if you love that added dimension, include the almond extract as well. These wet ingredients enrich the dough with flavor and help bind everything together smoothly.
Step 4: Color the Dough
Now comes the fun part to really evoke the fall spirit: add orange gel food coloring a few drops at a time until the dough glows with that perfect pumpkin shade. Using gel coloring is best as it won’t alter your dough’s consistency.
Step 5: Combine Dry and Wet Ingredients
Gradually mix the flour mixture into your colored dough. Be gentle but thorough, as overmixing can toughen the dough—your goal is a soft, slightly sticky ball ready for chilling.
Step 6: Chill the Dough
Divide the dough into two discs, wrap each tightly in plastic wrap, and refrigerate for at least one hour. Chilling firms up the dough, making it easier to roll and cut without losing shape or color vibrancy.
Step 7: Preheat and Roll Out
When ready to bake, heat your oven to 350°F (175°C) and prepare baking sheets with parchment paper. Roll out chilled dough on a lightly floured surface to about ¼-inch thickness, the perfect balance between sturdiness and tenderness for stuffed cookies.
Step 8: Cut and Prepare Cookies
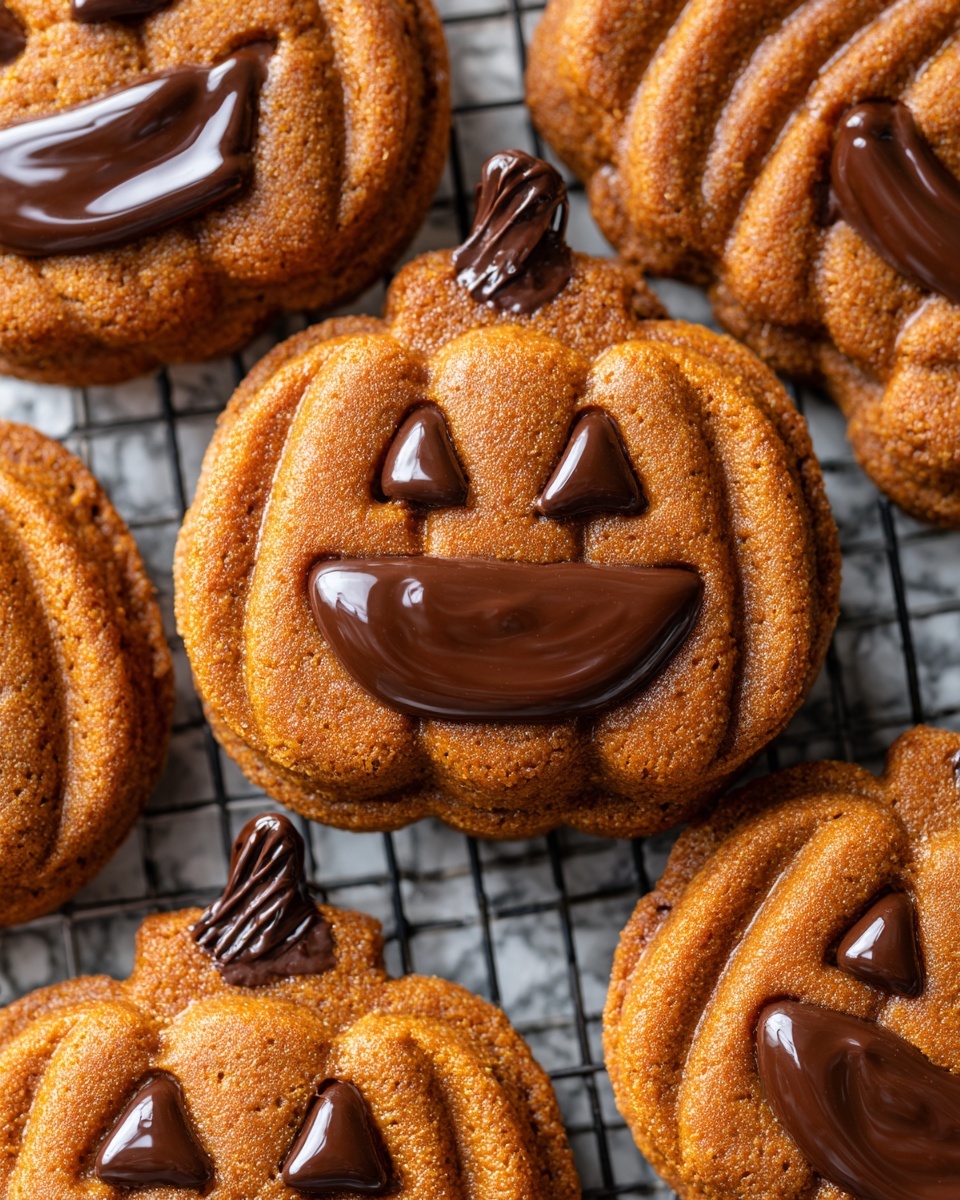
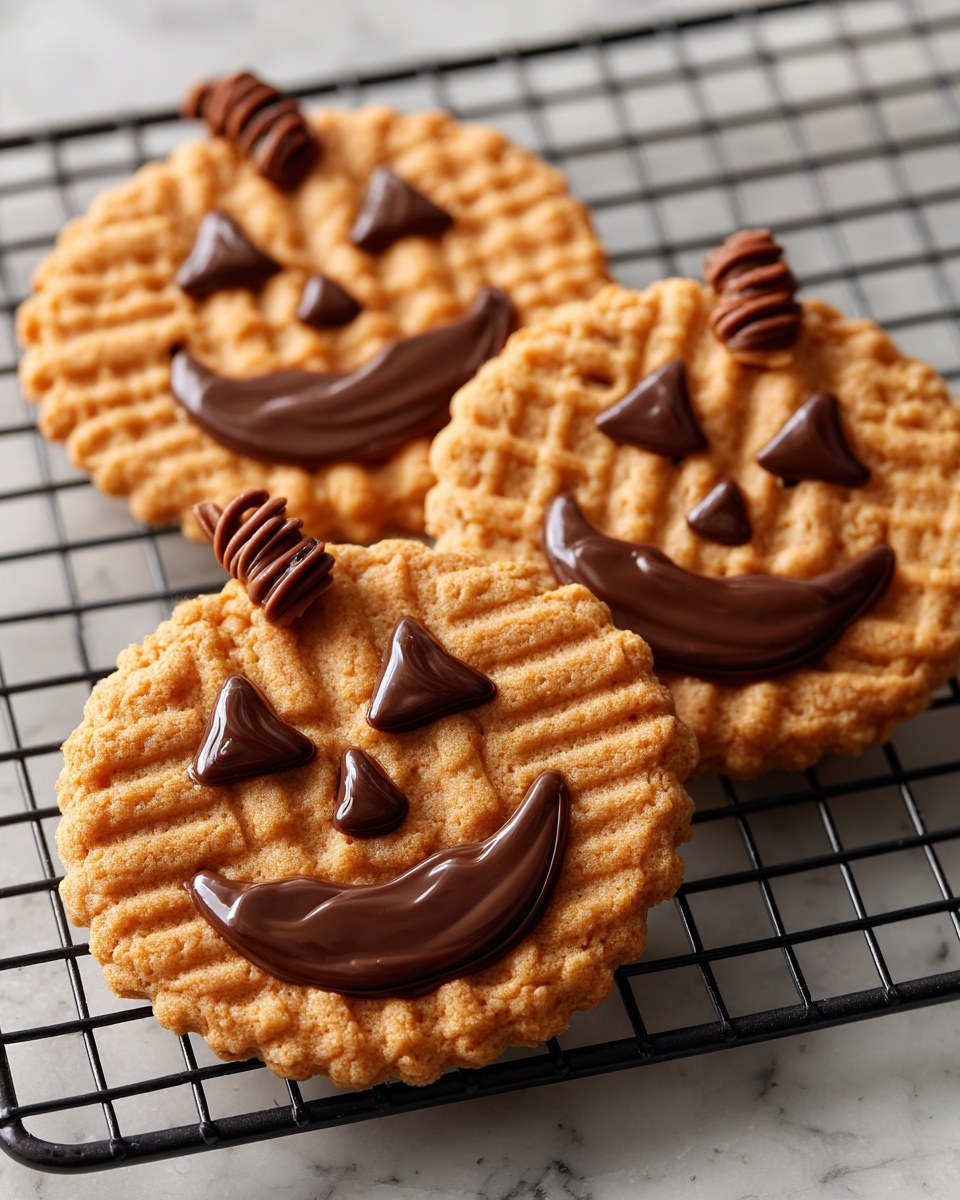
Using a pumpkin-shaped cookie cutter, cut out an even number of cookies. On half, carve jack-o’-lantern faces gently with a small knife or a specialized face cutter—this touch gives personality and charm to each cookie.
Step 9: Assemble and Fill
Place the solid cookie shapes on the baking sheet, add a small spoonful of milk chocolate or a melted chocolate square right in the center. If your chocolate feels too thick, stir in a tablespoon of heavy cream to melt it smoothly. Top each filled cookie with a carved cookie and gently press the edges to seal the chocolate inside.
Step 10: Bake to Perfection
Bake the cookies for 10 to 12 minutes, just until the edges begin to turn golden. This timing ensures the cookies remain soft and the chocolate inside is deliciously gooey. Let them cool on the baking sheet for about 5 minutes before transferring to a wire rack to finish cooling.
How to Serve Milk Chocolate Stuffed Jack-O’-Lantern Cookies Recipe
Garnishes
These cookies are charming on their own, but adding festive garnishes can elevate them even more. Consider a light dusting of powdered sugar mimicking a soft autumn frost or a sprinkle of sanding sugar around the edges for sparkle and crunch. A drizzle of white icing artfully zigzagged over the cookies can add contrast and whimsy, accentuating those delightful jack-o’-lantern faces.
Side Dishes
The warm melt of milk chocolate inside these cookies pairs beautifully with a scoop of vanilla ice cream or a dollop of whipped cream. You can also serve them alongside a hot apple cider or a spiced chai latte to complete a cozy seasonal dessert experience that delights your guests and warms your soul.
Creative Ways to Present
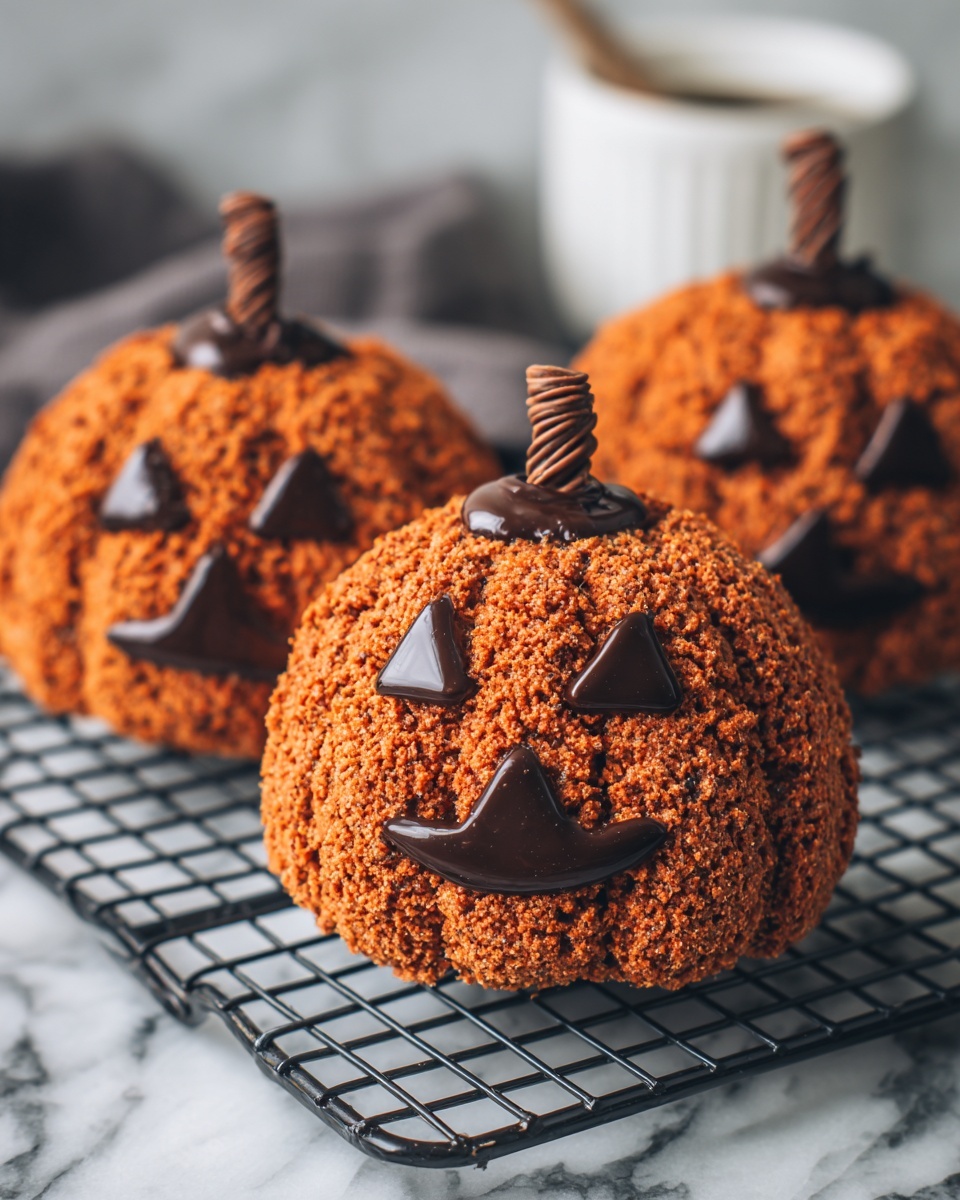
For a playful presentation, arrange your Milk Chocolate Stuffed Jack-O’-Lantern Cookies Recipe on a rustic wooden board sprinkled lightly with autumn leaves or mini pumpkins. Stack them up high for a tempting tower or place them in a decorative Halloween-themed box for gift-giving. Adding edible glitter or candy eyes lets you personalize each cookie’s spooky face, making them perfect party favors or treats for trick-or-treaters.
Make Ahead and Storage
Storing Leftovers
You can keep your leftover cookies fresh for up to 4 days when stored in an airtight container at room temperature. This preserves their soft texture and keeps the milk chocolate center perfectly melty yet contained. Avoid stacking them too tightly to maintain their charming face carvings intact.
Freezing
Milk Chocolate Stuffed Jack-O’-Lantern Cookies Recipe freezes wonderfully. Place cooled cookies in a single layer on a baking sheet to freeze individually, then transfer them to a freezer-safe container or bag. They stay fresh for up to 2 months. When you want a treat, just thaw at room temperature and enjoy that fresh-baked magic again.
Reheating
If you want to enjoy these cookies warm with gooey chocolate again, pop them in the microwave for about 10 seconds or briefly heat in a warm oven (around 300°F) for 5 minutes. This gentle reheating revives the soft texture and melty center without drying them out.
FAQs
Can I substitute dark or white chocolate for the milk chocolate filling?
Absolutely! While milk chocolate gives a classic creamy sweetness, dark chocolate offers a richer, more intense flavor, and white chocolate adds a lovely sweetness that contrasts nicely with the spiced dough. Feel free to experiment according to your taste.
What if I don’t have a pumpkin-shaped cookie cutter?
No worries at all! You can use any Halloween-themed cutters you have, such as ghosts, bats, or leaves, or even freehand cut them with a knife for a rustic look. The key is the filling and the festive orange color to capture the spirit.
Is almond extract necessary?
The almond extract is optional but highly recommended for an extra layer of flavor that complements the vanilla and enhances the cookie’s overall aroma. If you have nut allergies or prefer a simpler taste, just skip it without any issues.
How do I prevent the cookies from spreading too much?
Chilling the dough is essential to keep your cookies crisp and well-shaped. Also, avoid adding too much flour when rolling out; a lightly floured surface is enough. This way, your jack-o’-lantern faces stay sharp and the cookies bake evenly.
Can these cookies be made vegan or gluten-free?
This recipe can be adapted by using vegan butter, egg substitutes like flax egg, and gluten-free flour blends. Keep in mind the texture might vary slightly, but with careful ingredient choices, you can enjoy a similarly delightful treat.
Final Thoughts
Trying out this Milk Chocolate Stuffed Jack-O’-Lantern Cookies Recipe is like inviting a bit of autumn joy and chocolaty warmth into your kitchen. It’s a recipe that’s as fun to make as it is to share, perfect for celebrating the season with loved ones. So grab your ingredients, get creative with those pumpkin faces, and enjoy the magical combination of colorful cookies with heavenly milk chocolate centers. These cookies are sure to become a cherished fall tradition in your home!
Print
Milk Chocolate Stuffed Jack-O’-Lantern Cookies Recipe
- Prep Time: 25 minutes (plus 1 hour chilling)
- Cook Time: 12 minutes
- Total Time: 1 hour 37 minutes
- Yield: 18 filled cookies
- Category: Dessert
- Method: Baking
- Cuisine: American
- Diet: Vegetarian
Description
These Milk Chocolate Stuffed Jack-O’-Lantern Cookies are perfect festive fall treats that combine classic sugar cookie dough with a gooey milk chocolate center. Flavored with vanilla and a hint of almond extract, and tinted with orange gel food coloring, these pumpkin-shaped cookies are ideal for Halloween celebrations and bring fun and flavor to your dessert table.
Ingredients
Dry Ingredients
- 2¾ cups all-purpose flour
- ½ teaspoon baking powder
- ½ teaspoon salt
Wet Ingredients
- 1 cup unsalted butter, softened
- 1 cup granulated sugar
- 1 large egg
- 1½ teaspoons vanilla extract
- ½ teaspoon almond extract (optional)
- Orange gel food coloring, a few drops
Filling
- ½ cup milk chocolate chips or squares
- 1 tablespoon heavy cream (optional, for melting chocolate)
Instructions
- Prepare Dry Ingredients: In a medium bowl, whisk together 2¾ cups all-purpose flour, ½ teaspoon baking powder, and ½ teaspoon salt until evenly combined.
- Cream Butter and Sugar: In a large mixing bowl, beat 1 cup softened unsalted butter with 1 cup granulated sugar until the mixture is light and fluffy, which helps create tender cookies.
- Add Eggs and Flavorings: Beat in 1 large egg, 1½ teaspoons vanilla extract, and if desired, ½ teaspoon almond extract for subtle nutty notes, mixing until smooth.
- Incorporate Food Coloring: Add orange gel food coloring a few drops at a time to the dough until you achieve your preferred pumpkin-orange shade, blending thoroughly.
- Combine Wet and Dry Mixtures: Gradually add the flour mixture to the wet ingredients, mixing just until a soft dough forms; avoid overmixing to keep cookies tender.
- Chill the Dough: Divide the dough into two equal halves, flatten each into discs, wrap tightly in plastic wrap, and refrigerate for at least 1 hour to firm up the dough for easier handling.
- Preheat and Prepare Baking Sheets: Preheat the oven to 350°F (175°C) and line baking sheets with parchment paper to prevent sticking and ensure even baking.
- Roll and Cut Cookies: On a lightly floured surface, roll out each chilled dough disc to approximately ¼-inch thickness. Use a pumpkin-shaped cookie cutter to cut out an even number of cookies for assembly.
- Create Jack-O’-Lantern Faces: On half of the cut cookies, use a small knife or a jack-o’-lantern face cutter to carefully carve out facial features to create festive cut-outs.
- Assemble Stuffed Cookies: Place the solid pumpkin-shaped cookies on the baking sheet; add a small spoonful or a square of milk chocolate in the center of each. Top with a carved face cookie and gently press the edges to seal the cookies together, encapsulating the chocolate filling.
- Bake: Bake the assembled cookies for 10 to 12 minutes, or until the edges just start to turn golden brown, indicating doneness without overbaking.
- Cool and Store: Allow cookies to cool on the baking sheet for 5 minutes to firm up, then transfer to a wire rack to cool completely. Once cooled, store in an airtight container to maintain freshness.
Notes
- If the chocolate filling is too thick, melt it with 1 tablespoon of heavy cream for easier spreading and a gooier center.
- Dark or white chocolate can be used as an alternative filling for different flavor variations.
- For an extra festive touch, decorate the cookie edges with sanding sugar or drizzle with icing after baking.


