
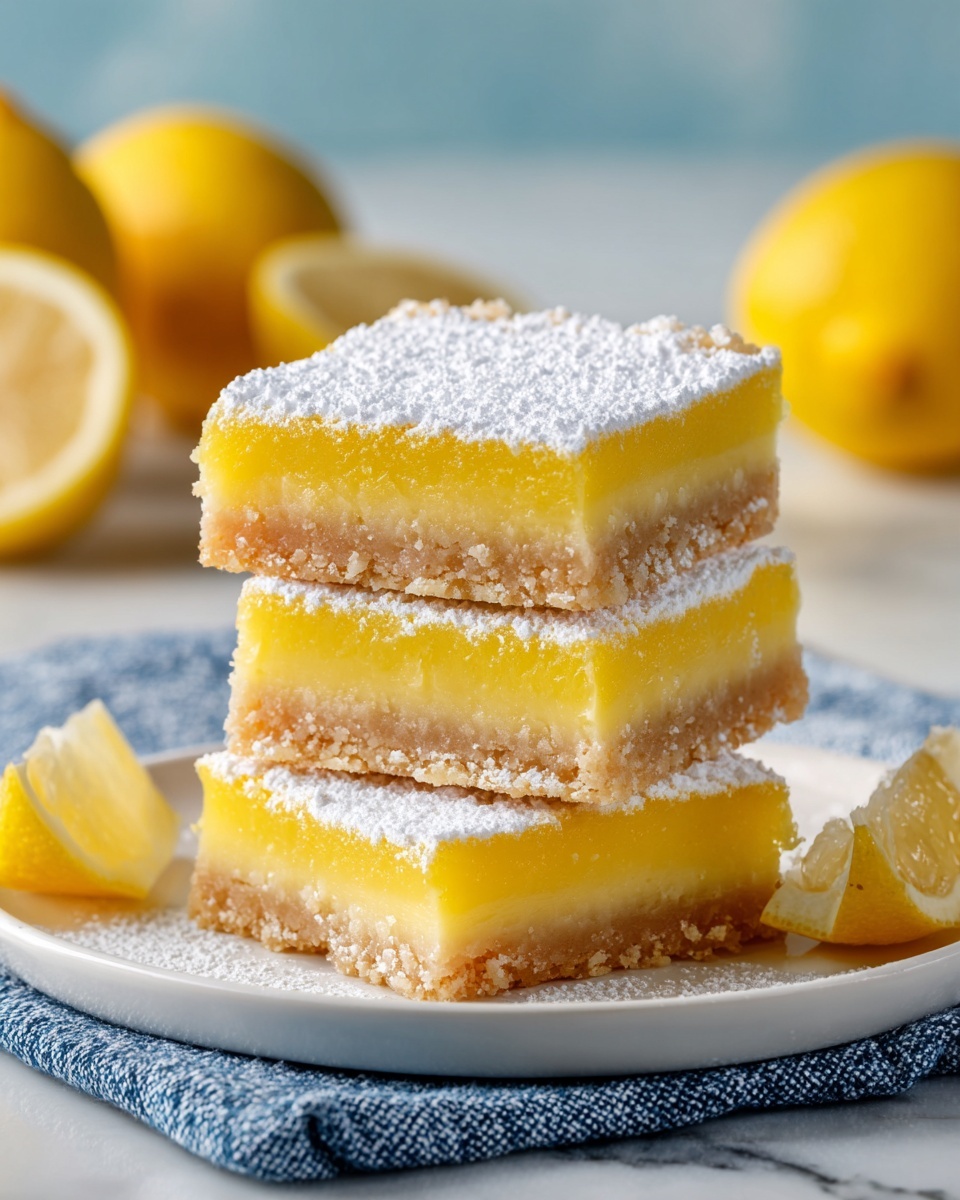
If you’re on the lookout for a bright, zesty dessert that’s both simple to make and kind to your dietary needs, you have to try this Easy Gluten-Free Lemon Bars Recipe. Bursting with vibrant lemon flavor and a tender, buttery crust, these bars are the perfect balance of sweet and tart, offering a fresh twist on a classic treat. Whether you’re gluten-free by necessity or choice, these lemon bars will delight your taste buds and impress anyone lucky enough to get a slice.

Ingredients You’ll Need
Gathering the right ingredients is the first step to baking these irresistible lemon bars that combine a crisp crust and luscious filling. Each ingredient plays a crucial role, from the buttery base that creates the perfect texture to the fresh lemon juice that packs in that unmistakable zing.
- Unsalted butter (½ cup, 1 stick), at room temperature: Provides richness and a tender crumb for the crust.
- Granulated sugar (¼ cup + 1 cup): Sweetness perfectly balanced between the crust and the tangy filling.
- Lemon zest (1 tbsp + 1 tbsp), grated on a Microplane: Delivers concentrated lemon oils for an aromatic punch.
- Vanilla extract (1 tsp): Adds a hint of warmth and depth to the crust flavor.
- Gluten-free all-purpose flour (1 cup + ½ cup): Forms the gluten-free crust and ensures the filling has the right consistency.
- Kosher salt (⅛ tsp + ⅛ tsp): Enhances all the flavors and balances the sweetness.
- Eggs (3), at room temperature: Bind the filling together for a smooth, custard-like texture.
- Lemon juice (½ cup), freshly squeezed: The star ingredient lending fresh acidity and brightness.
How to Make Easy Gluten-Free Lemon Bars Recipe
Step 1: Preheat and Prepare Your Pan
Start by heating your oven to 350°F. Grease an 8×8-inch baking dish to prevent sticking, then line it with overlapping rectangles of parchment paper. This extra step makes it a breeze to lift out the bars once they’re baked and cooled.
Step 2: Prepare the Crust
In a large bowl, cream together the butter, ¼ cup sugar, lemon zest, and vanilla extract until smooth and fluffy. Then, add the 1 cup gluten-free flour and ⅛ teaspoon kosher salt. Mix until everything is incorporated uniformly. Press this mixture firmly into your prepared baking dish and dock the surface with a fork to allow steam to escape, which helps keep the crust crisp.
Step 3: Bake the Crust
Bake your crust in the preheated oven for about 15-20 minutes, or until it’s lightly golden and set, forming a sturdy base to hold the luscious lemon filling.
Step 4: Make the Filling
While the crust cools just slightly, whisk together the eggs, 1 cup sugar, freshly squeezed lemon juice, remaining lemon zest, ½ cup gluten-free flour, and ⅛ teaspoon kosher salt until completely smooth. This mixture will create that irresistible, tangy filling that sets just right over your crust.
Step 5: Bake the Filling
Pour the smooth lemon filling evenly over the warm crust and return to the oven. Bake for 20-25 minutes, or until the filling is just set and no longer jiggles, ensuring a perfect custard-like consistency.
Step 6: Cool and Slice
Allow the lemon bars to cool completely in the baking dish on a wire rack. Once cooled, use the parchment paper to lift the whole slab out and gently dust with powdered sugar for a delicate finish. Slice into 16 squares for sharing or savoring all on your own.
How to Serve Easy Gluten-Free Lemon Bars Recipe
Garnishes
These lemon bars shine on their own but a sprinkle of powdered sugar or a few fresh lemon slices on top can add a pretty touch. For an extra pop of flavor, add a few sprigs of fresh mint or a light drizzle of honey to complement the tartness beautifully.
Side Dishes
Pair these bright lemon bars with a scoop of vanilla ice cream or a dollop of whipped cream for a classic combination. They also go wonderfully with fresh berries or a cup of light herbal tea to keep things refreshing and balanced.
Creative Ways to Present
If you’re serving these at a party, consider cutting them into mini squares and arranging them on a decorative platter with edible flowers for a whimsical touch. You can even use cookie cutters to create fun shapes, making this dessert both festive and fun!
Make Ahead and Storage
Storing Leftovers
Once cooled, store your lemon bars in an airtight container in the refrigerator. They will stay fresh and flavorful for up to 4 days, making them a convenient treat for snacks or dessert on busy days.
Freezing
If you want to keep these tasty bars longer, wrap them tightly in plastic wrap and then in aluminum foil before placing in a freezer-safe container. They freeze well for up to 2 months without losing that delicious texture.
Reheating
Enjoy chilled or bring the lemon bars to room temperature before serving for the best flavor. If you prefer them slightly warm, pop a slice in the microwave for about 10 seconds, but be careful not to heat too long or the filling might become too soft.
FAQs
Can I use regular flour instead of gluten-free?
Absolutely! If you’re not gluten-sensitive, you can substitute regular all-purpose flour in equal amounts. Just keep in mind that it will change the recipe from gluten-free but won’t affect the delicious lemon flavor.
Do I have to use fresh lemon juice?
Freshly squeezed lemon juice is best for the brightest, most vibrant flavor. Bottled lemon juice can be used in a pinch, but it may result in a less fresh-tasting filling.
Can I make these bars vegan?
This recipe relies on eggs and butter for texture and flavor, so converting it to vegan can be tricky. If you want vegan lemon bars, look for a recipe specifically designed to replace these ingredients effectively.
What’s the best way to cut the lemon bars without them crumbling?
Make sure the bars are fully cooled and chilled before slicing, and use a sharp knife that’s been warmed under hot water and dried. This helps achieve clean, precise cuts with minimal crumbling.
Can I add other flavors to the filling?
Yes! A touch of ginger or a sprinkle of poppy seeds can add exciting new dimensions. Just be careful not to overpower the lovely lemon essence which is the star of this Easy Gluten-Free Lemon Bars Recipe.
Final Thoughts
There’s something truly special about the simplicity and brightness of this Easy Gluten-Free Lemon Bars Recipe. It’s a fantastic way to indulge in a classic dessert without worrying about gluten, and its fresh lemon flavor brings sunshine to any day. Whether you’re baking for family, friends, or just treating yourself, these lemon bars are sure to become a favorite that you’ll make again and again.
Print
Easy Gluten-Free Lemon Bars Recipe
- Prep Time: 15 minutes
- Cook Time: 40 minutes
- Total Time: 1 hour 5 minutes
- Yield: 16 servings
- Category: Dessert
- Method: Baking
- Cuisine: American
- Diet: Gluten Free
Description
This Easy Gluten Free Lemon Bars recipe features a buttery, tender crust topped with a tangy, smooth lemon filling. Perfectly balanced between sweet and tart, these bars make a delightful treat suitable for those avoiding gluten. With simple ingredients and straightforward steps, they’re an ideal dessert for any occasion.
Ingredients
Crust
- ½ cup unsalted butter (1 stick), at room temperature
- ¼ cup granulated sugar
- 1 tbsp lemon zest (grated on a Microplane)
- 1 tsp vanilla extract
- 1 cup gluten-free all-purpose flour
- ⅛ tsp kosher salt
Filling
- 3 eggs, at room temperature
- 1 cup granulated sugar
- ½ cup freshly squeezed lemon juice
- 1 tbsp lemon zest (grated on a Microplane)
- ½ cup gluten-free all-purpose flour
- ⅛ tsp kosher salt
Instructions
- Preheat and Prepare Pan: Preheat your oven to 350°F (175°C). Grease an 8×8-inch baking dish and line it with overlapping rectangles of parchment paper to ensure easy removal later.
- Prepare the Crust: In a large bowl, beat together the unsalted butter, ¼ cup granulated sugar, 1 tablespoon lemon zest, and vanilla extract until well combined. Add 1 cup gluten-free flour and ⅛ teaspoon kosher salt, mixing until the dough is uniform. Press the dough evenly into the bottom of the prepared baking dish. Poke holes evenly across the surface with a fork to prevent bubbling during baking. Bake for about 15-20 minutes until the crust is set and lightly golden.
- Make the Filling: While the crust is baking, prepare the filling. In a medium bowl, beat together the 3 eggs, 1 cup granulated sugar, ½ cup freshly squeezed lemon juice, 1 tablespoon lemon zest, ½ cup gluten-free flour, and ⅛ teaspoon kosher salt until the mixture is smooth and well combined.
- Bake the Filling: Remove the crust from the oven and pour the lemon filling evenly over the hot crust. Return the pan to the oven and bake for an additional 20-25 minutes, or until the filling is set and no longer jiggly in the center.
- Cool and Serve: Let the lemon bars cool completely in the baking dish on a wire rack. Once cooled, dust the top with powdered sugar. Carefully use the parchment paper to lift the bars from the pan, slice into 16 squares, and serve.
Notes
- For best flavor, use freshly grated lemon zest and freshly squeezed lemon juice.
- Ensure eggs are at room temperature to help the filling bake evenly and smoothly.
- Press the crust firmly and evenly to avoid a crumbly base.
- Use parchment paper for easy removal and clean edges.
- Store leftovers in an airtight container in the refrigerator for up to 4 days.
- Optionally dust with powdered sugar right before serving for a decorative touch.
