
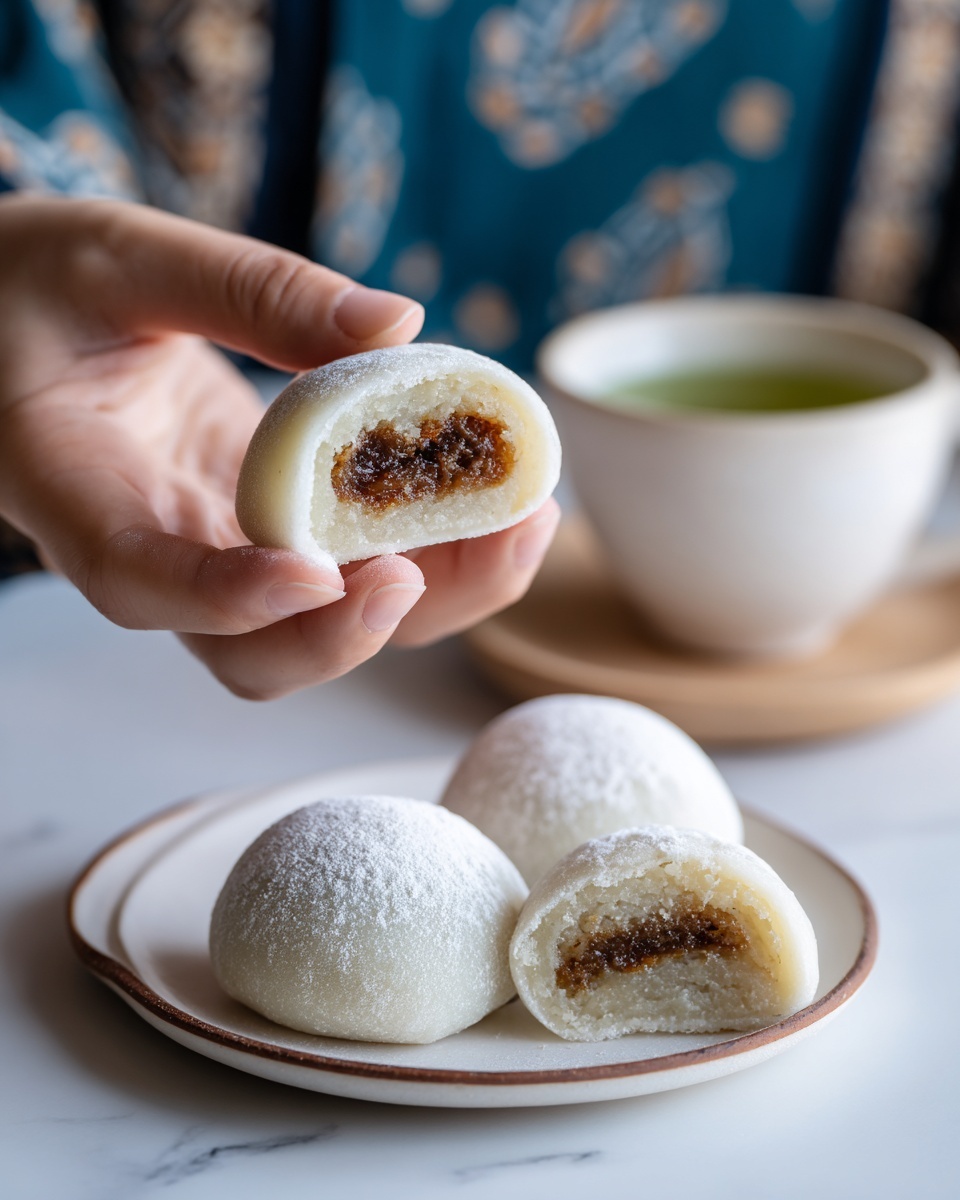
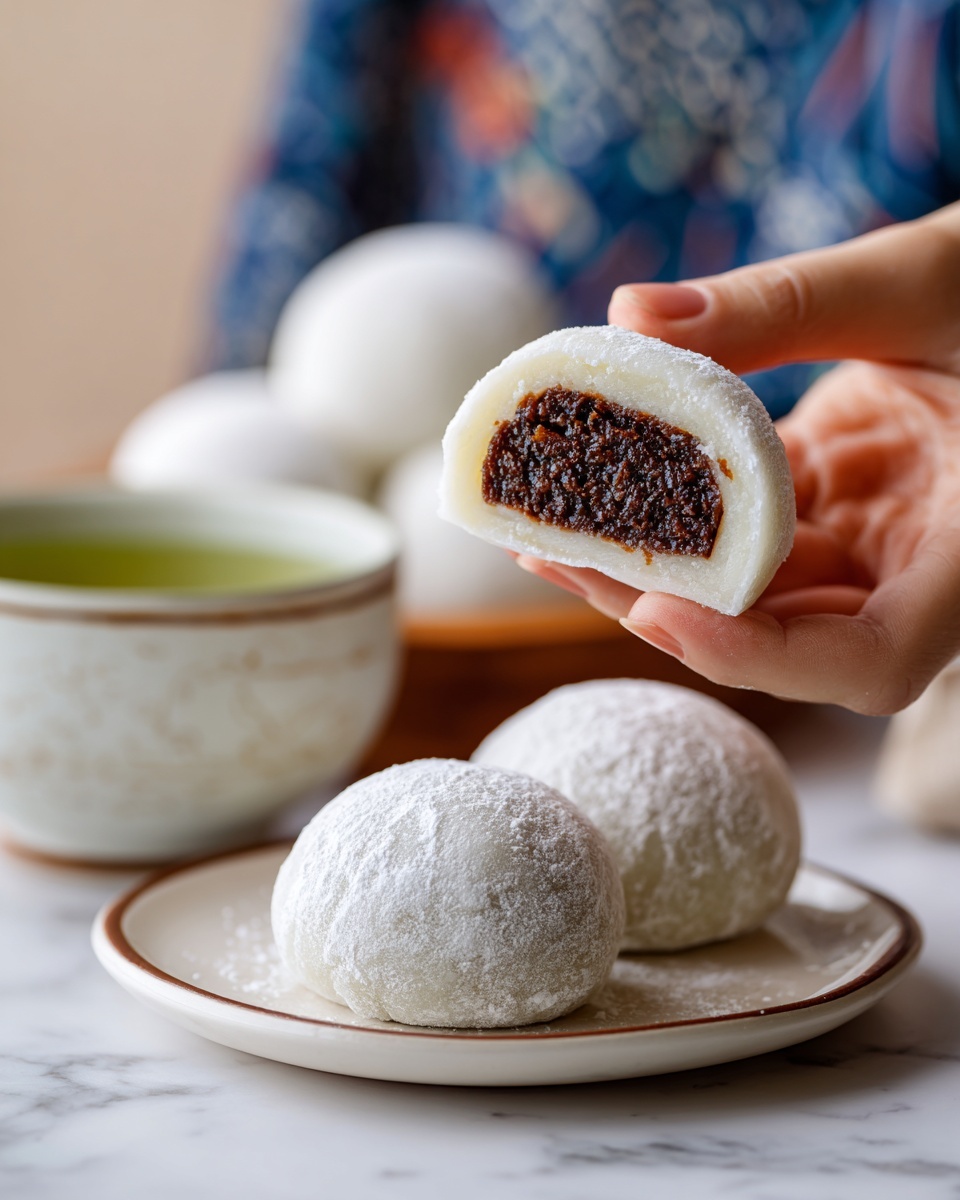
If you’ve ever been enchanted by the chewy, slightly sweet delight of Japanese mochi, you’re going to love this Easy Homemade Mochi with Fillings Recipe. It’s an inviting way to experience authentic mochi magic right in your kitchen, using a handful of simple ingredients and a microwave for quick preparation. Whether you fancy traditional sweet red bean paste, cool ice cream, or fresh fruit, this recipe is incredibly adaptable and guaranteed to bring smiles around your table. Let’s dive into the fun and rewarding world of homemade mochi together!
Ingredients You’ll Need
Making this Easy Homemade Mochi with Fillings Recipe is all about a few thoughtfully chosen ingredients that come together to create the classic chewy texture and subtle sweetness mochi is famous for. Each item plays an essential role, from the sticky rice flour that forms the base to the starch that keeps everything manageable and mess-free.
- Sweet rice flour (mochiko): This glutinous rice flour is the cornerstone for that tender, stretchy mochi texture.
- Water: Helps hydrate the flour and form the smooth dough.
- Granulated sugar: Adds the perfect touch of sweetness to balance the subtle rice flavor.
- Cornstarch or potato starch for dusting: Essential for preventing sticky mochi pieces from clumping together during preparation.
- Optional fillings such as sweet red bean paste, ice cream, or fruit: Customize your mochi by adding your favorite fillings for extra flavor and delight.
How to Make Easy Homemade Mochi with Fillings Recipe
Step 1: Combine the Base Ingredients
Start by mixing the sweet rice flour, water, and sugar in a microwave-safe bowl until you have a smooth, lump-free batter. This simple mixture is the foundation of your mochi, so taking the time to get it well-combined ensures the best texture.
Step 2: Microwave and Stir
Cover the bowl loosely with plastic wrap or a microwave-safe plate to trap steam while cooking. Microwave on high for 1 minute, then give the mixture a good stir to distribute heat evenly. Repeat this two more times—first for another minute, then for 30 seconds to 1 minute until the mixture becomes thick, sticky, and slightly translucent. This part builds the signature chewy consistency that makes mochi so addictive.
Step 3: Cool and Prepare the Work Surface
Let your mochi dough cool for a few minutes to make it manageable. Meanwhile, generously dust a clean surface with cornstarch or potato starch—this will keep your sticky mochi from clinging to everything and help with shaping later on.
Step 4: Shape and Cut the Mochi
Transfer the mochi dough onto the starch-dusted surface and sprinkle more starch on top. Press and flatten the dough into an even layer about 1/4-inch thick. Then, use a knife to cut the dough into 6 to 8 pieces, depending on how large or small you want each mochi to be.
Step 5: Add Your Fillings and Seal
If you’re adding fillings like sweet red bean paste, ice cream, or fresh fruit, place a small spoonful in the center of each mochi piece. Carefully pinch the edges together to seal the filling inside and gently roll the mochi ball in more starch if needed. This step is where your mochi transforms into little bundles of joy!
Step 6: Serve or Store
Your homemade mochi is ready to be enjoyed immediately! If not eating right away, place them in an airtight container and refrigerate for up to two days.
How to Serve Easy Homemade Mochi with Fillings Recipe
Garnishes
Sprinkle a light dusting of extra starch or desiccated coconut on top to add a subtle texture contrast. You can also lightly drizzle some sweetened condensed milk or a dusting of matcha powder to enhance the flavor profile and visual appeal.
Side Dishes
Pair your mochi with a cup of green tea or a refreshing fruit tea to balance the sweetness and create a relaxing dessert experience. Small portions of fresh fruit on the side can also brighten the palate and complement the chewy texture.
Creative Ways to Present
Serve your mochi on a beautiful bamboo leaf or a minimalist ceramic plate to highlight the traditional roots and delicate nature of this treat. For special occasions, wrap each piece in colorful parchment paper or edible gold leaf for an elegant touch that will wow guests.
Make Ahead and Storage
Storing Leftovers
Place leftover mochi in an airtight container lined with parchment paper to prevent sticking, then refrigerate. Mochi eaten within two days maintains its best texture and flavor, though it may harden slightly in the fridge.
Freezing
For longer storage, freeze mochi pieces individually on a parchment-lined tray before transferring them to a sealed freezer bag. This prevents them from sticking together and lets you enjoy homemade mochi anytime you crave a chewy treat.
Reheating
Thaw frozen mochi at room temperature or gently microwave for about 15 seconds to soften. Be careful not to overheat, as it can become too sticky or tough. A quick microwave warm-up restores that soft chewiness perfectly.
FAQs
Can I use regular rice flour instead of sweet rice flour for this recipe?
Regular rice flour lacks the glutinous properties of sweet rice flour (mochiko) and won’t yield the characteristic chewiness of mochi. For the authentic texture and success of this Easy Homemade Mochi with Fillings Recipe, stick to sweet rice flour.
What fillings work best for this mochi recipe?
Traditional fillings like sweet red bean paste are classic, but ice cream and fresh fruit are delightful alternatives. Just be sure to freeze ice cream scoops ahead of time for easier assembly and to prevent melting.
Is this recipe gluten-free?
Yes! Since this mochi is made from sweet rice flour, it is naturally gluten-free, which makes it a fantastic treat for those with gluten sensitivities or celiac disease.
How sticky is the mochi dough to handle?
Mochi dough is very sticky and can be tricky to work with. Using cornstarch or potato starch on your hands and work surface prevents sticking and makes shaping easier. Wearing gloves or dampening your hands also helps.
Can I add flavors or colors to the mochi dough?
Absolutely! Incorporate a few drops of food coloring or natural flavors like matcha powder into the dough before microwaving. This adds a fun visual appeal and unique flavor touches to your Easy Homemade Mochi with Fillings Recipe.
Final Thoughts
This Easy Homemade Mochi with Fillings Recipe is such a joy to make and eat, blending the nostalgia of traditional Japanese sweets with the convenience of a quick microwave method. Whether you’re sharing with friends or indulging in a little self-care snack, making mochi from scratch is deeply satisfying and deliciously fun. Give it a try and bring a piece of Japan’s chewy charm into your own kitchen!
Print
Easy Homemade Mochi with Fillings Recipe
- Prep Time: 10 minutes
- Cook Time: 3 minutes
- Total Time: 13 minutes
- Yield: 6 to 8 pieces
- Category: Dessert
- Method: Microwave
- Cuisine: Japanese
- Diet: Gluten Free, Vegetarian
Description
This easy homemade mochi recipe features sweet rice flour combined with sugar and water, cooked quickly in the microwave to create a soft, sticky, and slightly translucent Japanese dessert. Perfect on its own or filled with sweet red bean paste, ice cream, or fruit, mochi offers a delightful chewy texture and subtle sweetness.
Ingredients
Basic Mochi Ingredients
- 1 cup sweet rice flour (mochiko)
- 3/4 cup water
- 1/4 cup granulated sugar
- Cornstarch or potato starch for dusting
Optional Fillings
- Sweet red bean paste
- Ice cream (small scoops, pre-frozen)
- Fruit pieces
Instructions
- Mix Ingredients: In a microwave-safe bowl, combine the sweet rice flour, water, and granulated sugar. Stir until the mixture is smooth and all ingredients are fully incorporated.
- Initial Cooking: Cover the bowl loosely with plastic wrap or a microwave-safe plate. Microwave on high for 1 minute to start cooking the mochi dough.
- First Stir and Cook: Remove the cover and stir the mixture well. Microwave again on high for another 1 minute to continue cooking and thickening the dough.
- Final Cook and Texture Check: Stir the dough once more, then microwave for a final 30 seconds to 1 minute until the dough is thick, sticky, and slightly translucent.
- Cooling: Allow the mochi to cool for several minutes until it is easier to handle but still pliable.
- Prepare Surface: Dust a clean work surface generously with cornstarch or potato starch to prevent sticking.
- Shape the Mochi: Transfer the mochi dough onto the dusted surface and sprinkle the top with additional starch. Flatten the dough evenly to about 1/4-inch thickness.
- Cut Pieces: Cut the flattened mochi into 6 to 8 pieces, depending on your preferred size.
- Add Fillings (Optional): Place a small spoonful of sweet red bean paste, ice cream, or fruit in the center of each mochi piece. Pinch the edges together carefully to seal and form a ball.
- Final Dusting and Storage: Roll filled mochi gently in starch if needed to prevent sticking. Serve immediately, or refrigerate uncovered for up to 2 days.
Notes
- For flavored mochi, add a few drops of food coloring or matcha powder to the mixture before microwaving.
- If using ice cream as filling, freeze small scoops ahead of time to simplify assembly.
- Use gloves or keep hands damp when handling mochi dough to prevent sticking.

