
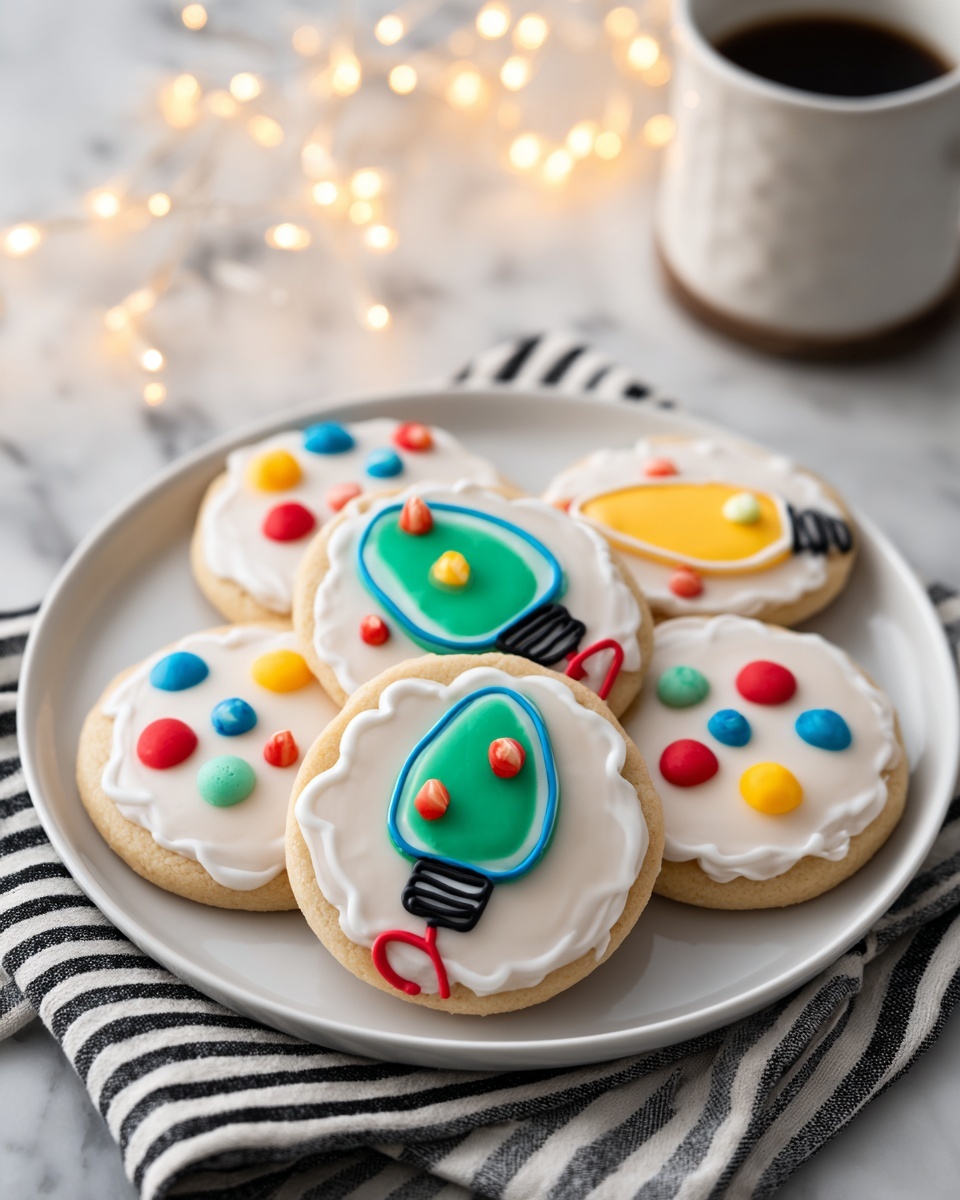
The Christmas Lights Royal Icing Sugar Cookies Recipe is hands down one of the most joyful, festive treats you can bake during the holiday season. These delightful sugar cookies are soft, buttery, and topped with colorful royal icing that mimics the glow of twinkling Christmas lights. It’s a recipe that not only fills your kitchen with the nostalgic scent of vanilla and almond but also invites all ages to participate in decorating and sharing. Whether you’re packing them into gift tins or serving them at a holiday party, these cookies bring that magical sparkle to every celebration.
Ingredients You’ll Need
Gathering these simple, classic ingredients is the first step to baking perfect Christmas lights cookies. Each component plays a critical role: the flour gives structure, butter and sugar provide richness and sweetness, and the royal icing transforms plain cookies into a vibrant holiday canvas.
- 2 3/4 cups all-purpose flour: The base that gives your cookies their sturdy yet tender texture.
- 1 teaspoon baking soda: Helps the cookies rise just enough for a soft bite.
- 1/2 teaspoon baking powder: Adds a slight lift for lightness without spreading too much.
- 1 cup unsalted butter, softened: Gives buttery flavor and ensures dough is easy to work with.
- 1 1/2 cups granulated sugar: Sweetens the cookies while helping them achieve a crisp edge.
- 1 large egg: Binds ingredients and gives moisture for a tender crumb.
- 1 1/2 teaspoons vanilla extract: Infuses warm, inviting flavor.
- 1/2 teaspoon almond extract (optional): Adds a subtle nutty dimension to enhance the vanilla.
- 1/4 teaspoon salt: Balances sweetness and enhances flavor.
- For the royal icing: 4 cups powdered sugar, 3 tablespoons meringue powder, 6 tablespoons water (plus more if needed) – these create the perfect smooth, hard-drying icing.
- Black gel food coloring: For piping the string of lights that ties the design together.
- Assorted gel food colorings (red, green, blue, yellow, etc.): To create the vibrant, colorful “lights” on your cookies.
How to Make Christmas Lights Royal Icing Sugar Cookies Recipe
Step 1: Prepare the Dough
Start by preheating your oven to 375°F (190°C) and lining your baking sheets with parchment paper to keep things mess-free. In a medium bowl, whisk together the flour, baking soda, baking powder, and salt. This dry mix sets the foundation for soft, well-risen cookies. In a larger bowl, cream the softened butter and sugar until the mixture is light and fluffy—about 2 to 3 minutes. This step is crucial because it introduces air for perfect texture. Beat in the egg along with the vanilla and almond extracts, which add a rich, fragrant note. Gradually add your dry ingredients to the wet, mixing just until everything comes together to prevent overworking the dough. Then divide your dough into two, flatten each half into discs, wrap them tightly in plastic wrap, and chill in the fridge for at least one hour. This prevents spreading and helps the cookies keep their shape.
Step 2: Roll and Cut
Once chilled, lightly flour your surface and roll out the dough to about a 1/4-inch thickness. This thickness is perfect for baking soft yet sturdy cookies. Cut the dough into your preferred shapes—round ornaments or classic cookie shapes both work beautifully to mimic festive Christmas lights. Carefully transfer these cutouts onto your prepared baking sheets, spacing them evenly to allow room for gentle spreading.
Step 3: Bake and Cool
Bake the cookies for 8 to 10 minutes, or until you see the edges begin to turn a lovely light golden color. The key here is to bake until just done to maintain that tender interior. Remove the cookies and let them cool completely on a wire rack. This waiting time is important because royal icing adheres best to fully cooled cookies.
Step 4: Make and Color the Royal Icing
In a large bowl, combine powdered sugar, meringue powder, and water. Beat with an electric mixer on medium-high for 5 to 7 minutes until stiff peaks form—this stiff consistency ensures your icing will dry hard and shiny. Divide the icing into portions, adding black gel coloring to one bowl for the “string” of lights, and various bright colors to others for the “bulbs.”
Step 5: Decorate Your Cookies
Using a piping bag or a small squeeze bottle, carefully pipe a black string across each cookie to represent the wire of the Christmas lights. Then, using the colored icings, add tiny “light” dots along the string in fun festive colors. Let each cookie dry completely before stacking or storing them, ensuring your artwork remains perfect.
How to Serve Christmas Lights Royal Icing Sugar Cookies Recipe

Garnishes
While the royal icing decoration steals the show, you can sprinkle edible glitter or sanding sugar over the cookies for an extra sparkle that makes your Christmas lights truly twinkle. These little touches add visual texture and make the cookies look professionally decorated.
Side Dishes
Serve your Christmas Lights Royal Icing Sugar Cookies Recipe alongside a warm cup of spiced hot chocolate or creamy eggnog. The rich drinks complement the sweet cookie and keep the cozy holiday vibes flowing throughout your gathering.
Creative Ways to Present
Arrange your decorated cookies on a festive platter shaped like a wreath or tie sets with colorful ribbons in small clear bags to give as thoughtful homemade gifts. You can also create an edible garland by threading a needle with ribbon and carefully piercing each cookie before drying, allowing you to hang your delicious lights around your home!
Make Ahead and Storage
Storing Leftovers
Keep your leftover cookies fresh by storing them in an airtight container. Because royal icing dries hard, it’s best to place parchment paper between layers to avoid any sticking or damage to your beautiful decorations. Stored properly, they stay fresh for up to a week.
Freezing
You can freeze undecorated cookie dough discs or fully baked cookies before decorating. Wrap tightly in plastic wrap and place in an airtight freezer bag. When you’re ready, thaw completely before decorating to preserve texture and color quality.
Reheating
These cookies are best enjoyed at room temperature, but if you prefer them slightly warm, let them sit out for a bit. Avoid microwaving or applying direct heat, as this can soften the royal icing and compromise the decorating work.
FAQs
Can I make these cookies dairy-free?
Yes! Substitute the unsalted butter with a dairy-free margarine or coconut oil, but be aware this might subtly alter the flavor and texture. The royal icing ingredients remain the same, and you can use vegan meringue powder as needed.
How long does royal icing take to dry?
Royal icing typically takes 4 to 6 hours to dry completely at room temperature. For best results, let cookies dry overnight before stacking or packaging.
Can I store decorated cookies for gift-giving?
Absolutely! Store them in an airtight container with parchment layers to keep decorations intact. They make wonderful gifts when wrapped in festive tins or cellophane bags tied with ribbons.
What if my icing is too thick or too thin?
If your royal icing is too thick, add a few drops of water at a time to thin it. If it’s too thin, add a bit more powdered sugar. The goal is a smooth, pipeable consistency for decorating intricate designs.
Is it okay to mix colors for the “lights”?
Yes! Mixing and matching gel food colors gives you vibrant, unique “lights” on your cookies, adding to the festive fun. Just take care to rinse your piping tools between colors to avoid muddying shades.
Final Thoughts
Getting cozy with the Christmas Lights Royal Icing Sugar Cookies Recipe is one of those magical holiday experiences you’ll want to repeat year after year. It’s a perfect blend of baking joy, creative decorating, and festive flavor that brings everyone to the table, sugar-coated smiles guaranteed. So grab your rolling pin, invite your favorite helpers, and make this recipe part of your holiday tradition—you won’t regret it!
Print
Christmas Lights Royal Icing Sugar Cookies Recipe
- Prep Time: 30 minutes
- Cook Time: 10 minutes
- Total Time: 40 minutes (plus 1 hour chilling and icing drying time)
- Yield: 24 cookies
- Category: Dessert
- Method: Baking
- Cuisine: American
- Diet: Vegetarian
Description
Celebrate the holidays with these festive Christmas Lights Royal Icing Sugar Cookies—classic sugar cookies topped with vibrant royal icing to resemble colorful Christmas light strings. Perfect for holiday gatherings and gifting, these cookies combine buttery, tender dough with smooth, glossy icing that hardens beautifully for detailed decoration.
Ingredients
Cookie Dough
- 2 3/4 cups all-purpose flour
- 1 teaspoon baking soda
- 1/2 teaspoon baking powder
- 1 cup unsalted butter, softened
- 1 1/2 cups granulated sugar
- 1 large egg
- 1 1/2 teaspoons vanilla extract
- 1/2 teaspoon almond extract (optional)
- 1/4 teaspoon salt
Royal Icing
- 4 cups powdered sugar
- 3 tablespoons meringue powder
- 6 tablespoons water (plus more as needed)
- Black gel food coloring
- Assorted gel food colorings (red, green, blue, yellow, etc.) for the lights
Instructions
- Prepare Dry Ingredients: In a medium bowl, whisk together the all-purpose flour, baking soda, baking powder, and salt ensuring an even distribution of leaveners and seasoning throughout the flour.
- Cream Butter and Sugar: Using a large bowl, cream the softened unsalted butter and granulated sugar together until the mixture is light and fluffy. This process should take about 2–3 minutes using a mixer on medium speed, which helps incorporate air for tender cookies.
- Add Wet Ingredients: Beat in the large egg, vanilla extract, and if using, almond extract. Mix until fully combined which enhances flavor and structure.
- Combine Dry and Wet Mixtures: Gradually add the dry ingredient mixture to the wet ingredients. Mix just until the dough starts to come together to avoid overworking, which could make the cookies tough.
- Chill Dough: Divide the dough into two halves and shape each into a flat disc. Wrap tightly in plastic wrap and chill in the refrigerator for one hour to firm up the dough for easier rolling and cleaner cookie cuts.
- Roll and Cut Cookies: On a floured surface, roll out each disc of dough to approximately 1/4 inch thickness. Use your favorite cookie cutters, such as round or holiday shapes, to cut out shapes and place them on parchment-lined baking sheets.
- Bake Cookies: Bake in a preheated oven at 375°F (190°C) for 8–10 minutes or until the edges begin to turn a light golden color. Remove from the oven and let cookies cool completely on wire racks before decorating.
- Make Royal Icing: In a large bowl, combine powdered sugar, meringue powder, and water. Beat on medium-high speed with an electric mixer until stiff peaks form, about 5–7 minutes. Adjust consistency with additional water if necessary for piping.
- Color Icing and Decorate: Divide the icing into multiple bowls and tint using black gel food coloring for the string and assorted gel colors for bulbs. Pipe a black icing line to create the ‘string’ on each cookie, then pipe small multicolored ‘lights’ along the line.
- Dry and Store: Allow the decorated cookies to dry completely at room temperature so the royal icing hardens. Store in a single layer or separated with parchment paper to maintain decoration quality.
Notes
- Cookies can be prepared ahead of time and frozen unbaked or baked and frozen before decorating.
- Royal icing dries to a hard finish; store cookies in layers separated by parchment paper to prevent sticking or damage.
- Add edible glitter or sanding sugar to icing for extra sparkle and festive touch.


