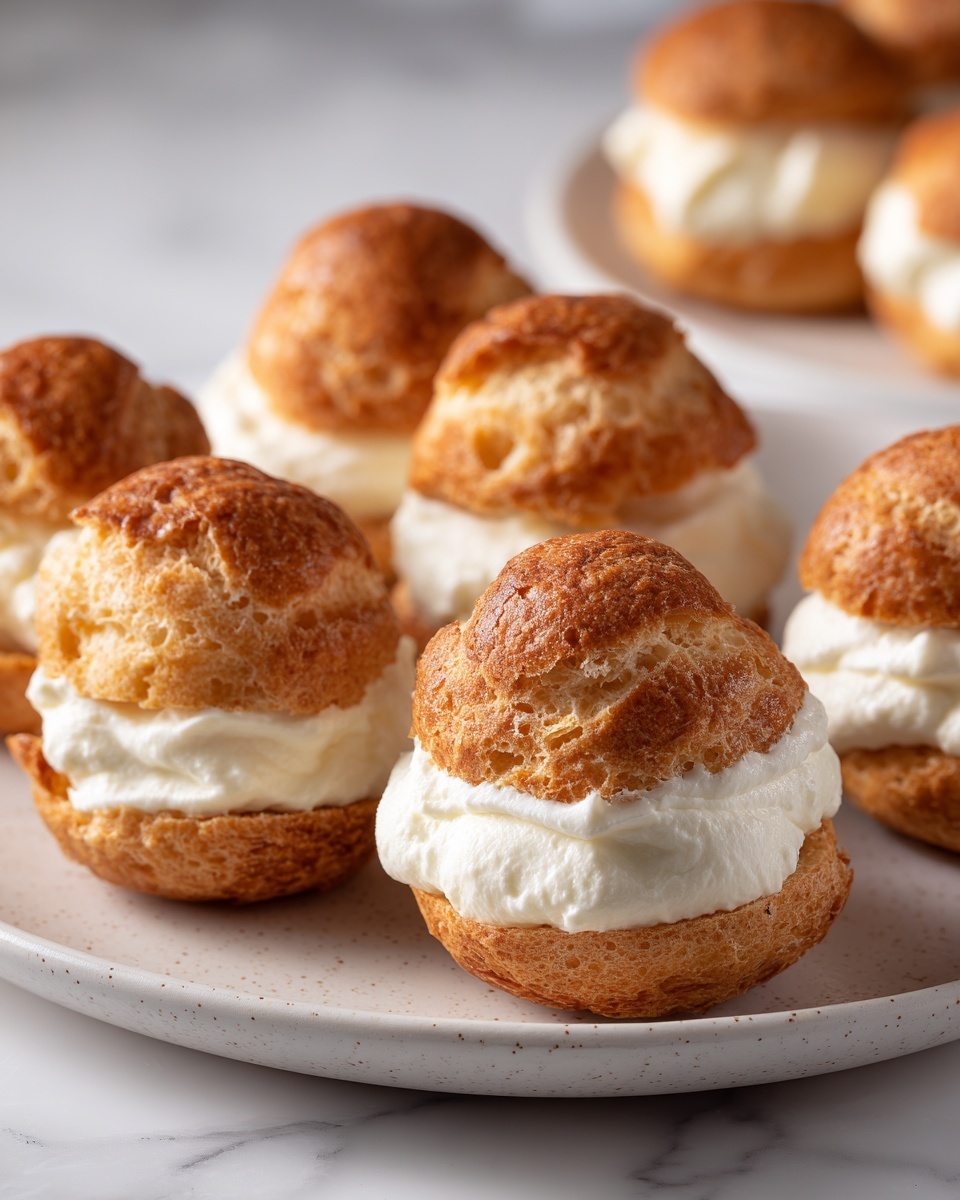
If you’re searching for a truly delightful dessert to impress family and friends, you’ve just struck gold with Mom’s Famous Cream Puffs Recipe. These light, airy pastries filled with a creamy, luscious vanilla filling bring a perfect balance of fluffy texture and rich flavor that keeps everyone coming back for more. This recipe has that nostalgic, homemade charm that turns a simple gathering into a memorable celebration. Whether you’re baking for a special occasion or just because you adore a sweet treat, Mom’s Famous Cream Puffs Recipe is an absolute must-try that feels like a warm hug from the inside.
Ingredients You’ll Need
Mom’s Famous Cream Puffs Recipe calls for a handful of simple, classic ingredients that come together beautifully to create something extraordinary. Each ingredient plays a vital role in achieving the perfect texture and flavor — from the buttery dough that puffs up in the oven to the creamy vanilla filling that makes every bite heavenly.
- Butter (1 stick / 8 Tablespoons): Adds richness and helps create that tender, flaky texture in the puff pastry.
- Water (1 cup): The liquid component that helps steam the pastry for that perfect puff.
- Vanilla (1 teaspoon): Infuses a subtle, comforting aroma and enhances the sweet flavor.
- Eggs (4 large): Vital for binding and giving the dough structure while helping it rise beautifully.
- Flour (1 cup): The base of the dough, providing structure and the right chewiness.
- Heavy cream (1 pint): Whipped to create the luscious, fluffy filling every cream puff deserves.
- Instant vanilla pudding mix (3.4 ounces): Adds a burst of creamy vanilla flavor and helps thicken the filling.
- Milk (⅓ cup): Used to soften the pudding mix and achieve the perfect filling consistency.
How to Make Mom’s Famous Cream Puffs Recipe
Step 1: Bring Butter, Water, and Vanilla to a Boil
The magic begins by combining butter, water, and a hint of vanilla in a saucepan over medium heat. Bringing this mixture to a boil ensures that the butter melts completely and infuses the water with that sweet vanilla aroma, setting the stage for a dough that bakes up soft yet sturdy. This is where the rich flavor foundation forms.
Step 2: Add Flour and Stir Until It Forms a Ball
Once boiling, add the flour all at once and stir vigorously. This step is crucial to cook out the raw flour taste and to form a smooth dough that clings together and pulls away from the pot’s sides. Your arm might get a workout here, but it’s worth it to develop that perfect texture for puffing up later.
Step 3: Remove from Heat and Let Cool
Letting the dough cool slightly is essential so the eggs don’t scramble when added. This cooling period also lets the dough firm up a bit, making it ready for the next step where it transforms into that airy shell everyone waits for.
Step 4: Beat in Eggs One at a Time
Slowly add the eggs, one by one, making sure each is fully incorporated before adding the next. This process turns the dough silky smooth and glossy and is what gives the pastry its rise and lightness during baking. Watching this transformation is always satisfying and pretty fun!
Step 5: Drop by Tablespoon onto Parchment-Lined Cookie Sheets
Using a spoon or piping bag, drop dollops of the dough onto baking sheets lined with parchment paper. Space them out well, because they puff up quite a bit. This step shapes the individual cream puffs and prepares them for their golden transformation.
Step 6: Bake at 400°F for 25–30 Minutes
Bake the dough until the cream puffs puff spectacularly and turn golden brown on top. This high heat creates steam inside, expanding the dough and giving that delicate hollow center perfect for filling. Resist opening the oven early — patience pays off big here!
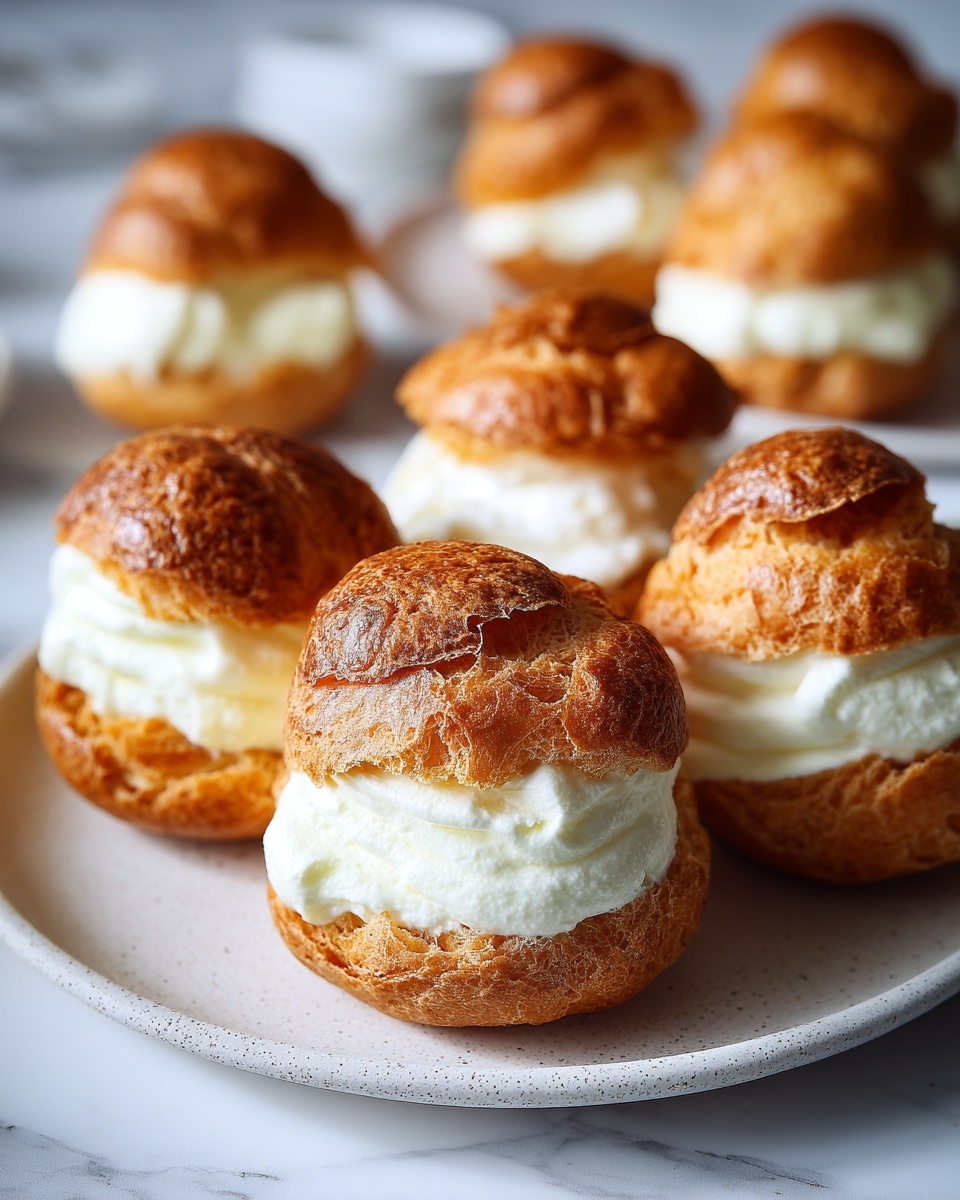
Step 7: Let Cool and Slice in Half
After baking, cool the puffs completely before slicing them horizontally. This helps avoid deflating those air pockets and prepares the puffs for the delicious filling, the true star inside.
Step 8: Prepare the Filling with Heavy Cream, Vanilla Pudding, and Milk
In a mixing bowl, whip the heavy cream until it starts to thicken, then add the instant vanilla pudding mix blended with milk. Whip everything together until fluffy and luscious. This filling is creamy with just the right sweetness and stability to complement the airy pastry.
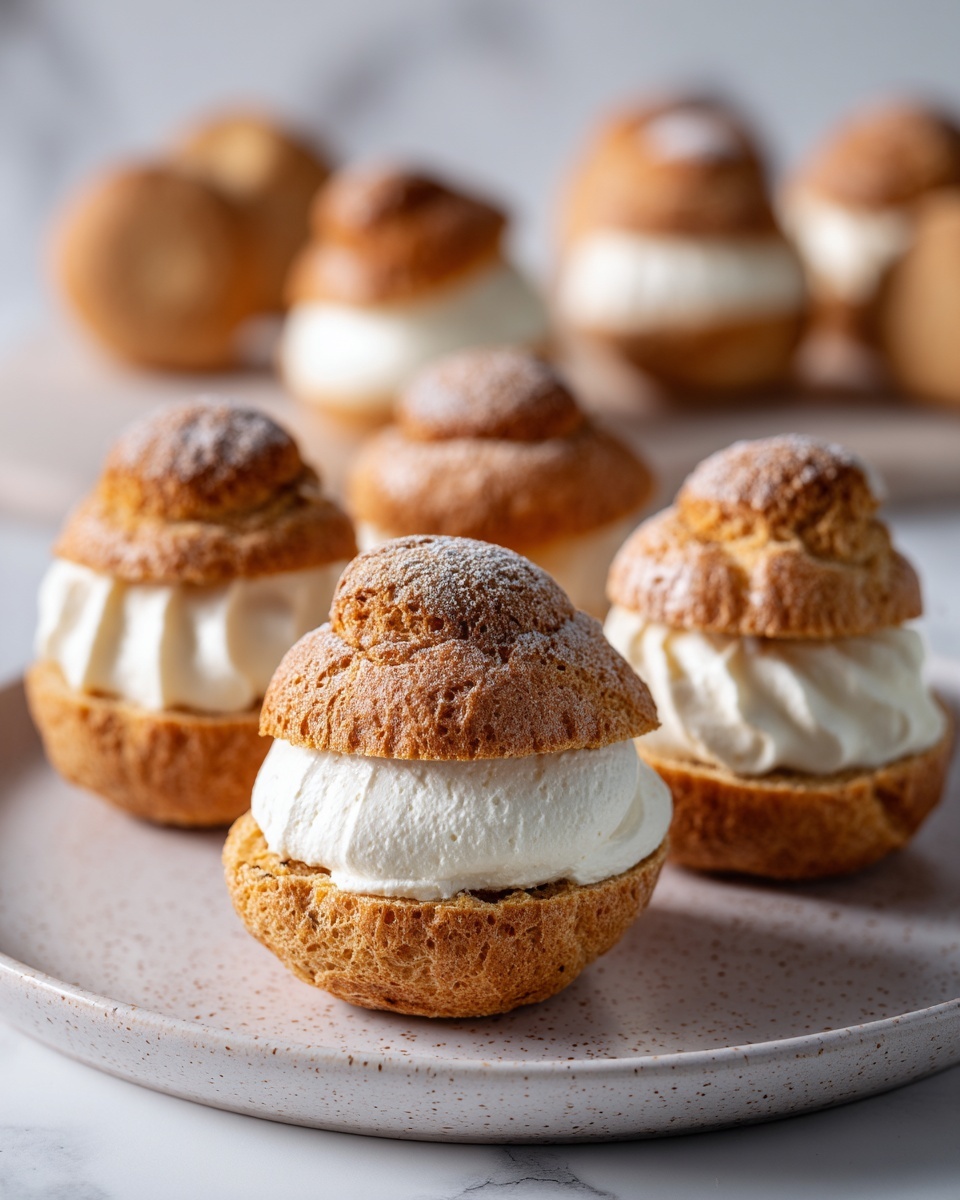
Step 9: Fill the Cream Puffs and Dust with Powdered Sugar
Pipe or spoon generous amounts of the creamy filling into each puff, then dust the tops lightly with powdered sugar for that charming, elegant finish. This last touch makes them as beautiful as they are delicious and ready to brighten anyone’s day.
How to Serve Mom’s Famous Cream Puffs Recipe
Garnishes
To elevate Mom’s Famous Cream Puffs Recipe, consider garnishing with fresh berries like raspberries or strawberries, or a sprinkle of finely grated chocolate. These little touches add color and a fresh flavor contrast that brightens the creamy richness wonderfully.
Side Dishes
Serve these cream puffs alongside a simple fruit salad or a refreshing cup of iced tea for a light, delightful pairing. Their richness balances well with crisp, tangy fruits and a cool beverage, making for a well-rounded dessert experience.
Creative Ways to Present
For a fun twist, stack the cream puffs into a croquembouche tower for impressive celebrations, or serve them individually in mini glass bowls with extra filling and a drizzle of chocolate sauce. These playful presentations turn Mom’s Famous Cream Puffs Recipe into a dessert centerpiece that steals the show.
Make Ahead and Storage
Storing Leftovers
If you happen to have leftovers, store the filled cream puffs in an airtight container in the refrigerator. They’re best enjoyed within two days to keep the pastry crisp and the filling fresh without getting soggy.
Freezing
You can freeze the unfilled baked shells by placing them in a sealed freezer bag. When ready to enjoy, thaw completely and fill with freshly whipped cream filling. This way, you have quick access to this treat whenever a sweet craving strikes.
Reheating
To reheat unfilled cream puff shells, warm them in a 300°F oven for about 5-7 minutes to restore their crispness. Avoid reheating filled puffs directly, as the filling is best served chilled and fresh.
FAQs
Can I make Mom’s Famous Cream Puffs Recipe gluten-free?
Absolutely! You can substitute regular flour with a gluten-free all-purpose flour blend, but keep in mind the texture might be slightly different. Some experimenting may be needed to get that perfect puff, but it’s totally doable!
What can I use instead of instant vanilla pudding?
If you don’t have instant pudding mix, you can make a homemade vanilla custard or pastry cream. These alternatives provide the creamy vanilla flavor and thickness needed for the filling but may require more prep time.
How do I prevent the cream puffs from collapsing?
Make sure to bake them long enough until golden and fully crisp, and avoid opening the oven door during baking. Also, don’t fill the puffs until they are completely cooled, which helps maintain their structure.
Can I use a different filling?
Definitely! While the vanilla pudding and cream filling is classic, you can fill your puffs with chocolate mousse, fruit curds, or even savory mixtures if you want to get creative.
Are these cream puffs suitable for freezing after they’re filled?
It’s best to freeze the shells before filling to keep them crisp. Filled cream puffs can become soggy upon thawing, so fill them fresh after you thaw the shells for optimal texture.
Final Thoughts
There’s something truly special about baking from a recipe that feels like a warm family tradition and Mom’s Famous Cream Puffs Recipe captures just that. These cream puffs are a perfect treat to share, delighting friends and family with their lightness and creamy sweetness. I invite you to give this recipe a try and discover just how magical homemade cream puffs can be.
Print
Mom’s Famous Cream Puffs Recipe
- Prep Time: 20 minutes
- Cook Time: 30 minutes
- Total Time: 50 minutes
- Yield: 16 servings
- Category: Dessert
- Method: Baking
- Cuisine: French-American
Description
Delight in Mom’s Famous Cream Puffs, a classic French-inspired dessert featuring light, airy choux pastry filled with a rich and creamy vanilla pudding whipped cream filling. These cream puffs are baked to golden perfection, then generously filled and dusted with powdered sugar, making them an irresistible treat perfect for any occasion.
Ingredients
Choux Pastry
- 1 stick butter (8 Tablespoons)
- 1 cup water
- 1 tsp vanilla extract
- 1 cup all-purpose flour
- 4 large eggs
Filling
- 1 pint heavy cream
- 1 package (3.4 ounces) instant vanilla pudding mix
- ⅓ cup milk
For Garnish
- Powdered sugar for dusting
Instructions
- Boil Butter Mixture: In a medium saucepan, combine the butter, water, and vanilla extract. Bring the mixture to a rolling boil over medium heat, ensuring the butter is completely melted.
- Make Dough: Reduce heat to low and quickly add the flour all at once. Stir vigorously and constantly until the mixture pulls away from the sides of the pot and forms a smooth ball of dough.
- Cool Dough: Remove the dough from heat and allow it to cool slightly for 5-10 minutes, ensuring it’s warm but not hot before adding eggs.
- Add Eggs: Beat in the eggs one at a time, mixing well after each addition until the dough is smooth and glossy.
- Shape Puffs: Using a tablespoon, drop spoonfuls of the dough onto parchment-lined baking sheets, spacing them adequately as they will puff up while baking.
- Bake: Bake in a preheated 400°F (204°C) oven for 25-30 minutes or until the puffs are puffed up and golden brown. Avoid opening the oven during baking to maintain steam inside.
- Cool: Remove from oven and allow the puffs to cool completely on a wire rack.
- Prepare Filling: In a mixing bowl, whisk together the instant vanilla pudding mix and milk until set. In a separate bowl, whip the heavy cream until stiff peaks form, then fold the pudding mixture gently into the whipped cream for a creamy filling.
- Fill Puffs: Slice each puff in half horizontally and pipe or spoon in the prepared filling generously.
- Garnish and Serve: Dust the filled cream puffs with powdered sugar just before serving to add a sweet decorative touch.
Notes
- Ensure the dough cools enough before adding eggs to prevent scrambling.
- Do not open the oven door during baking to help puffs rise properly.
- Filling can be prepared ahead and refrigerated to save time.
- Use parchment paper to prevent sticking during baking.
- For extra flavor, add a pinch of salt to the dough mixture.
- The cream puffs are best enjoyed fresh but can be refrigerated for up to 2 days.


