
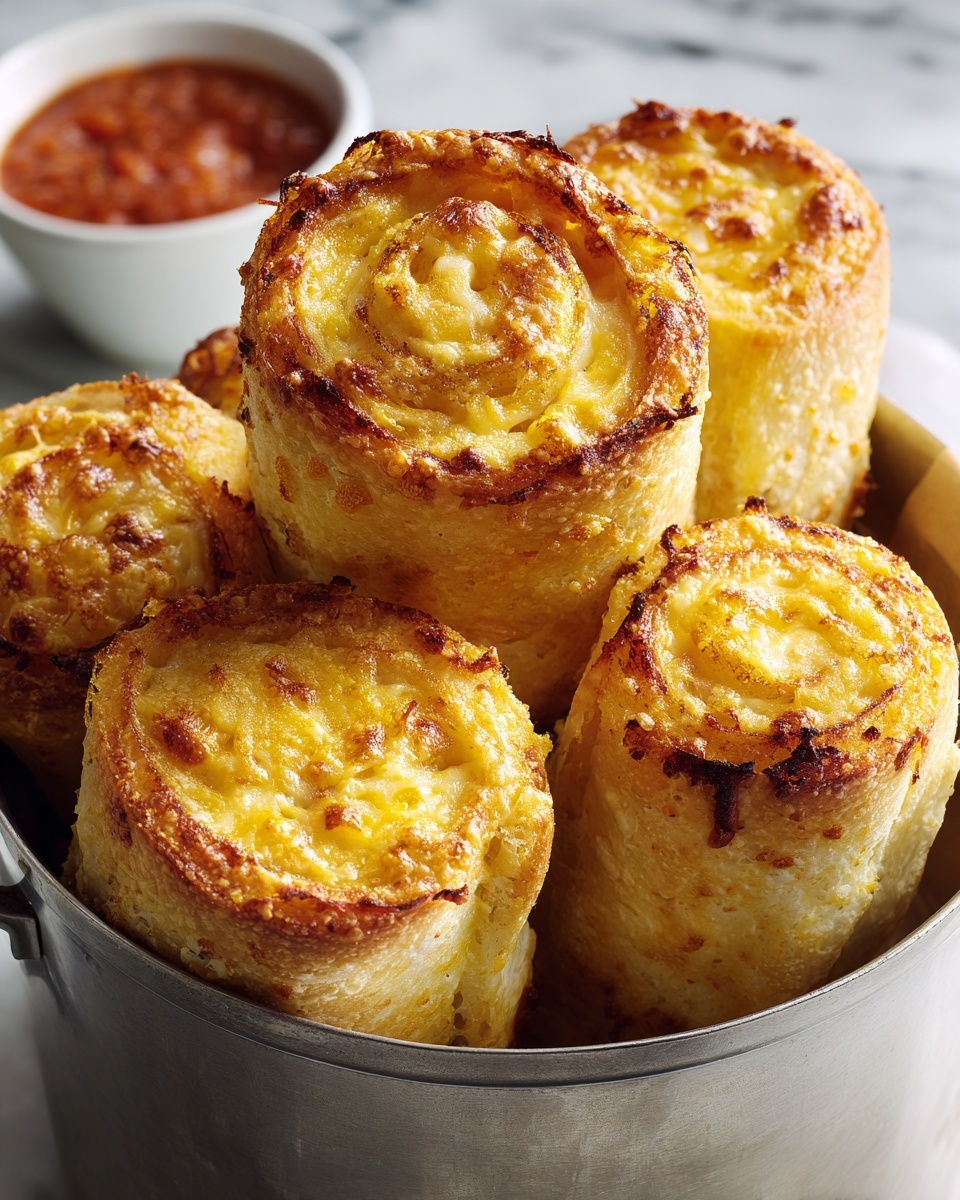
If you are craving a nostalgic yet fun twist on a classic comfort food, look no further than this irresistible Grilled Cheese Roll Ups Recipe. Imagine all the gooey cheese and buttery crispiness of a traditional grilled cheese sandwich conveniently wrapped into a perfect little roll, making it an ideal snack for kids, a quick lunch, or even a cozy appetizer. These roll ups are quick to make, wonderfully versatile, and guaranteed to put a big smile on anyone’s face with every bite.
Ingredients You’ll Need
The magic behind these Grilled Cheese Roll Ups lies in a few simple ingredients that each bring something special to the table. Every element works in harmony to create that irresistible combination of melty cheese, golden toasted bread, and a touch of richness.
- White sandwich bread: Soft and easy to flatten, perfect for rolling and creating a crisp exterior once cooked.
- American or cheddar cheese slices: Classic melty cheeses that provide creamy texture and sharp, satisfying flavor.
- Unsalted butter: Adds richness and helps achieve that beautiful golden crust when pan-frying.
- Optional garlic powder or Italian seasoning: These add a subtle depth of flavor that takes the roll ups from simple to gourmet.
How to Make Grilled Cheese Roll Ups Recipe
Step 1: Flatten the Bread
Start by removing the crusts from each slice of bread — this makes rolling easier and keeps the texture uniform. Using a rolling pin, gently flatten each piece until it’s thin and pliable, which helps it perfectly encase the cheese without tearing.
Step 2: Add the Cheese
Place one slice of your chosen cheese onto each flattened bread slice. If your cheese slice is bigger than your bread, trim it to fit so every bite has just the right amount of melty goodness.
Step 3: Roll Them Up
Roll the bread slice tightly around the cheese, pressing the edge gently to seal so the cheese stays inside during cooking. The rolling action creates that fun, bite-sized spiral shape that’s both portable and playful.
Step 4: Cook the Roll Ups
Heat a non-stick skillet over medium heat and melt the softened butter. Once bubbly and melted, place the roll ups seam-side down to secure their shape while cooking. Fry them for 2 to 3 minutes on each side until every side is golden brown and the cheese on the inside has melted into luscious creaminess.
Step 5: Cool and Serve
Once cooked, remove your roll ups from the pan and allow them to cool for a few minutes. This cooling step lets the cheese set slightly, so it’s easier to handle and even more enjoyable to eat.
How to Serve Grilled Cheese Roll Ups Recipe

Garnishes
Add a sprinkle of freshly chopped herbs like parsley or chives on top for a pop of color and a hint of freshness that complements the richness of the cheese. A light dusting of paprika can bring a beautiful hint of smoky warmth and visual appeal.
Side Dishes
These roll ups pair wonderfully with a warm bowl of tomato soup, classic comfort food pairing at its finest. For more variety, consider serving alongside crisp celery sticks, a fresh green salad, or tangy pickles to balance the richness with some crunch and acidity.
Creative Ways to Present
For a fun party appetizer, slice each roll up into bite-sized pinwheels and arrange them on a platter with small dipping bowls of marinara sauce, ranch dressing, or even a spicy mustard to keep your guests delighted. You can also skewer them individually on toothpicks for an easy grab-and-go snack option.
Make Ahead and Storage
Storing Leftovers
If you have leftovers, store them in an airtight container in the refrigerator for up to two days. This way, you can enjoy that comforting taste without making a new batch.
Freezing
Grilled Cheese Roll Ups can be frozen for longer storage. Place them on a parchment-lined tray, freeze until solid, then transfer to a freezer-safe bag. They keep for up to one month and can be cooked from frozen with a slight increase in cooking time.
Reheating
The best way to reheat these roll ups is in a skillet over medium heat so they regain their crispy exterior without becoming soggy. Avoid microwaving if you want to keep that perfect crunch.
FAQs
Can I use other types of bread for this recipe?
Absolutely! While white sandwich bread is classic for its soft texture and easy flattening, whole wheat or even flavored bread like garlic bread can add a unique twist. Just make sure it’s not too thick to roll tightly around the cheese.
What cheeses work best for Grilled Cheese Roll Ups Recipe?
American and cheddar are classics for their meltability and flavor, but feel free to experiment with mozzarella for a stringy stretch or provolone for a slightly sharper note. Mixing cheeses is also a delicious option!
Can I add protein to make them more filling?
Yes, adding a thin slice of ham, turkey, or even cooked bacon inside before rolling is a fantastic way to turn these into a heartier snack or lunch option. It adds extra flavor and satisfaction.
How do I prevent the bread from getting soggy?
Flattening the bread and cooking until golden brown creates a barrier that keeps the inside melty but prevents sogginess. Also, make sure not to overload with cheese, and cook over medium heat for a perfectly crisp finish.
Are these suitable for kids?
Definitely! These roll ups are a hit with kids because they are easy to handle, fun to eat, and full of familiar flavors. Plus, you can customize the fillings to suit your child’s preferences.
Final Thoughts
If you have been searching for an easy, tasty, and fun way to enjoy the comforting vibes of grilled cheese with a playful twist, this Grilled Cheese Roll Ups Recipe is a must-try. Whether you’re cooking for yourself, your kids, or a crowd, these roll ups are quick to make and guaranteed to bring joy with every crunchy, cheesy bite. So grab your bread and cheese, and enjoy turning this simple snack into a delightful experience.
Print
Grilled Cheese Roll Ups Recipe
- Prep Time: 10 minutes
- Cook Time: 10 minutes
- Total Time: 20 minutes
- Yield: 8 roll ups
- Category: Snack
- Method: Stovetop
- Cuisine: American
- Diet: Vegetarian
Description
Delicious and easy-to-make Grilled Cheese Roll Ups that are perfect as a quick snack or lunch option. These roll ups feature melted American or cheddar cheese wrapped in flattened bread slices, pan-fried to golden perfection for a crispy outside and gooey inside. Customize with your favorite seasonings or add deli meat for a heartier treat.
Ingredients
Bread and Cheese
- 8 slices white sandwich bread (crusts removed)
- 8 slices American or cheddar cheese
For Cooking
- 2 tablespoons unsalted butter (softened)
Optional Seasonings
- Garlic powder or Italian seasoning for extra flavor (optional)
Instructions
- Flatten the Bread: Using a rolling pin, flatten each slice of bread until it is thin and pliable for rolling.
- Add Cheese: Place one slice of American or cheddar cheese on each flattened bread slice, trimming the cheese if needed for a perfect fit.
- Roll Up Bread and Cheese: Tightly roll up each slice, pressing the edge to seal the roll and keep the cheese inside during cooking.
- Heat the Skillet: Heat a non-stick skillet over medium heat and add the softened butter, allowing it to melt completely.
- Cook the Roll Ups: Place the roll ups seam-side down in the skillet. Cook for 2–3 minutes on each side, turning carefully until all sides are golden brown and the cheese inside has melted.
- Serve: Remove the roll ups from the skillet and let them cool slightly before serving. Enjoy warm, optionally with dipping sauces like marinara or ranch.
Notes
- Use different cheeses such as mozzarella or provolone for a variation in flavor and texture.
- Add a slice of deli ham or turkey inside before rolling for a more substantial snack or light meal.
- Serve alongside tomato soup or your favorite dipping sauces like marinara or ranch to enhance the experience.


