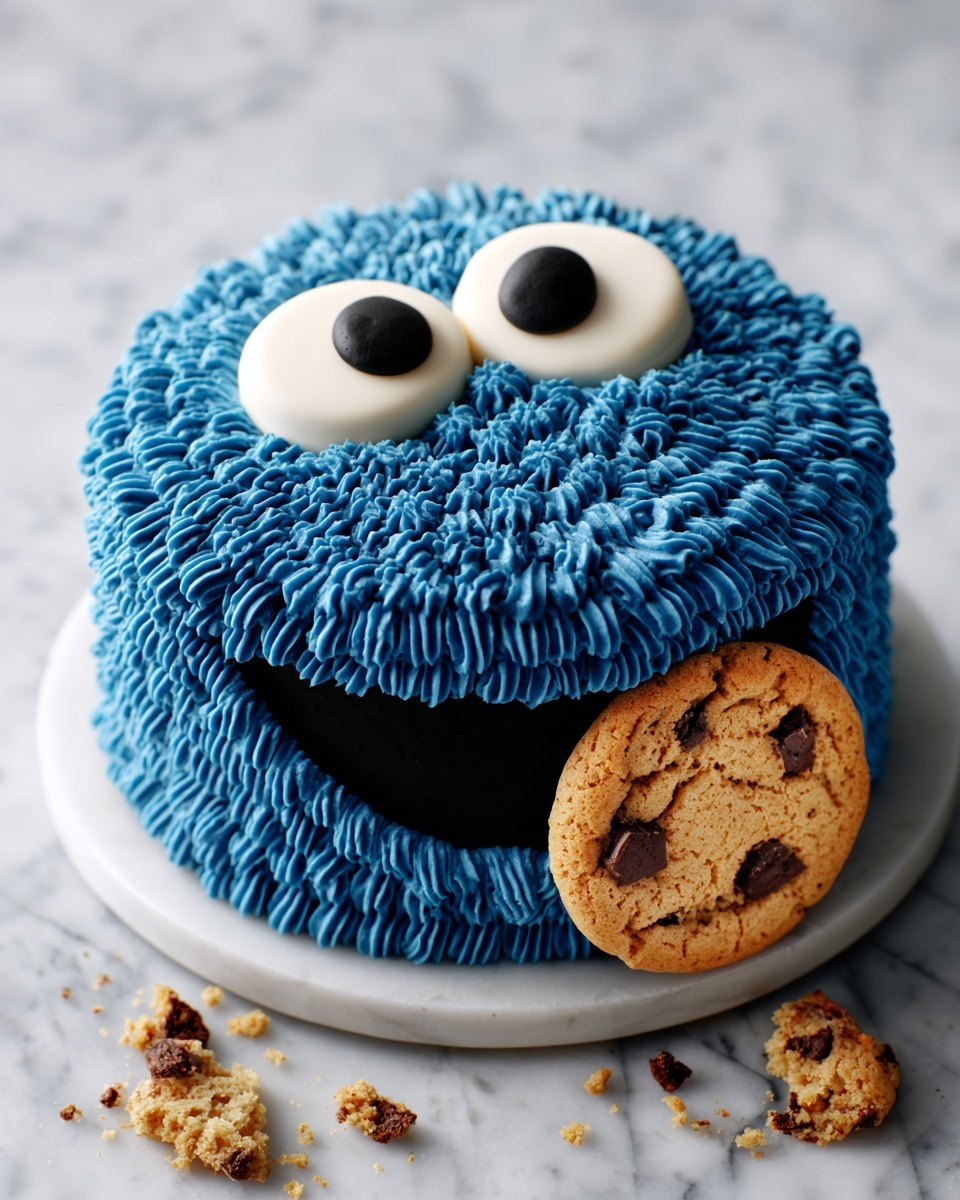
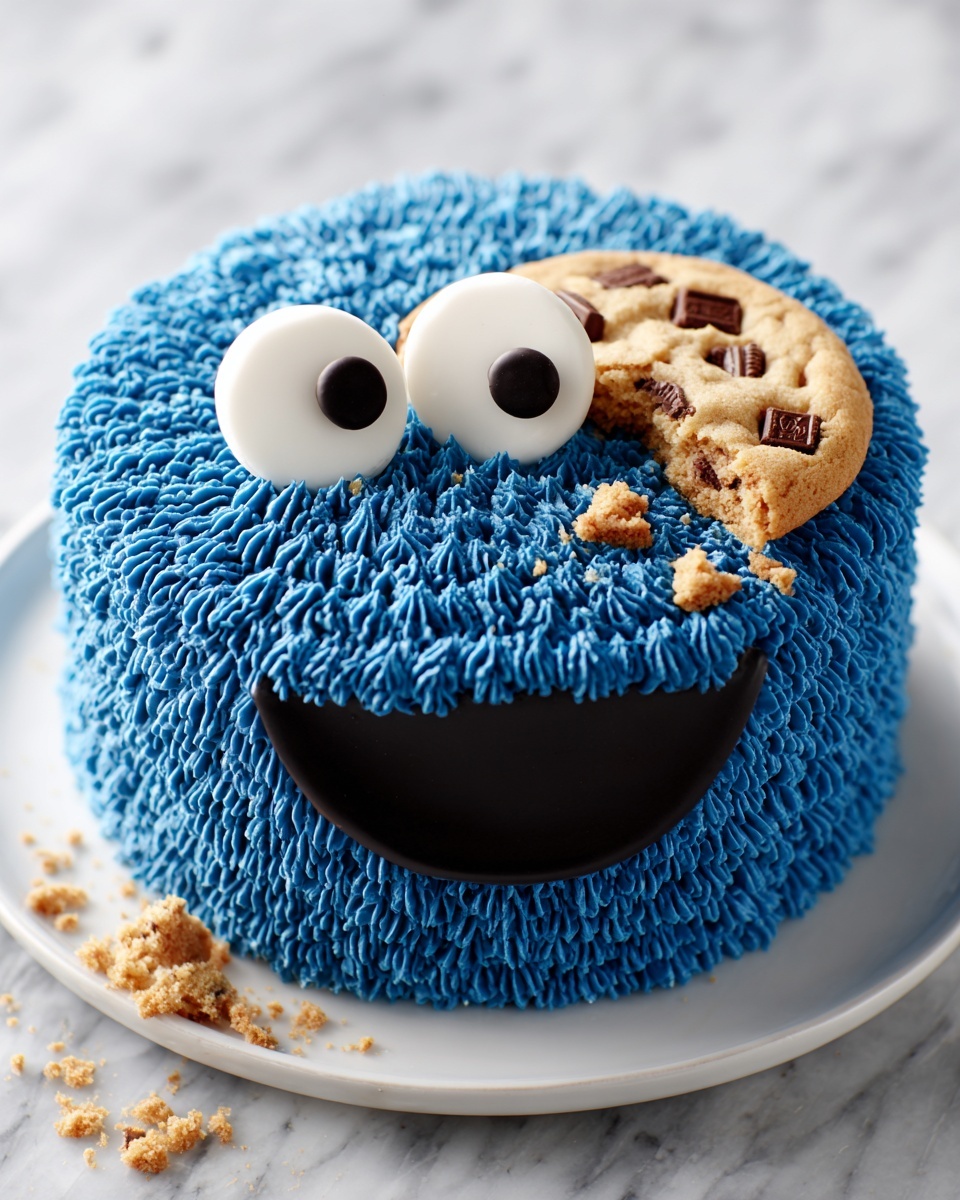
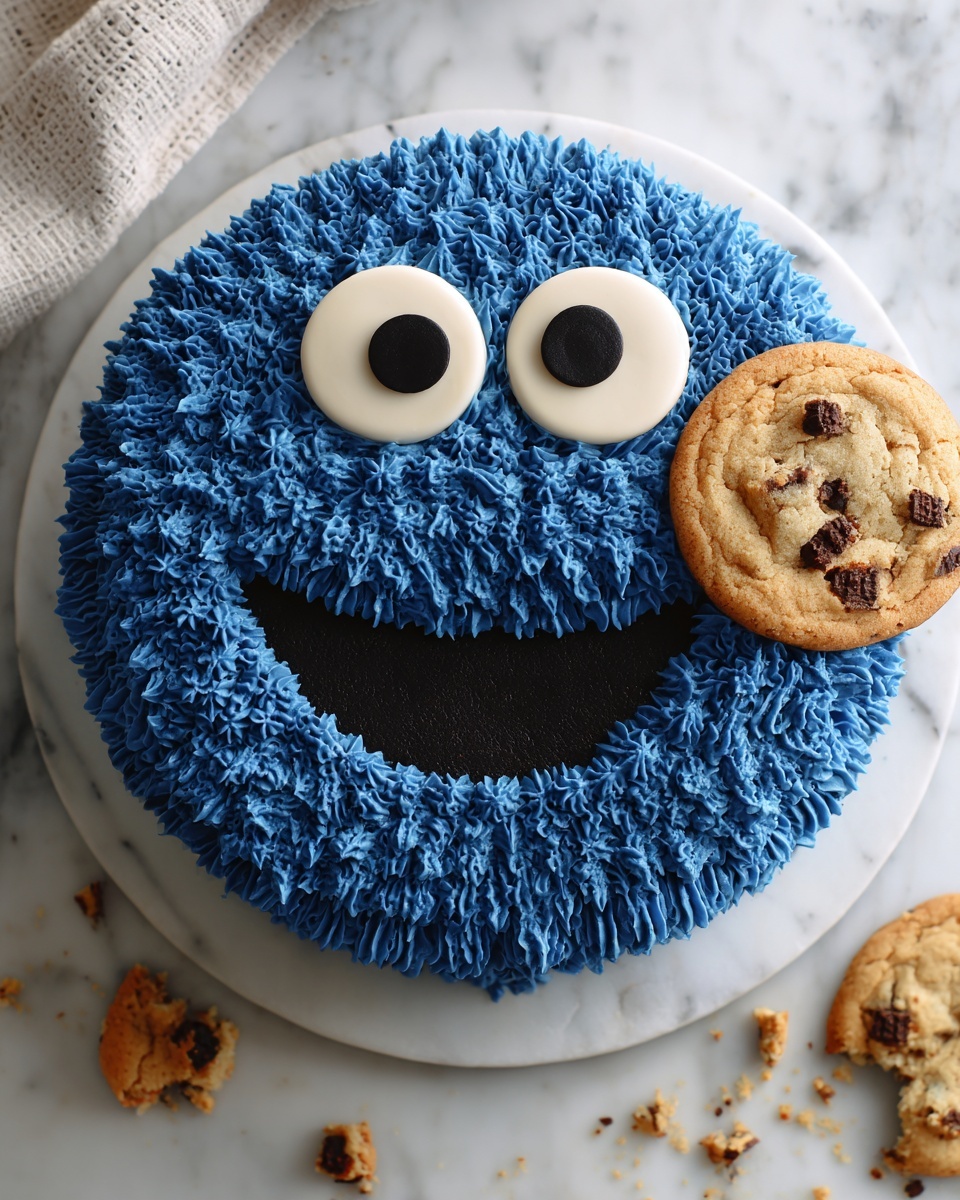
If you are looking for a cake that combines nostalgia, fun, and incredible flavor all in one, the Cookie Monster Cake Recipe is exactly what you need to try. This playful dessert is a stunning celebration of everyone’s favorite blue friend from Sesame Street, packed with moist cake layers, rich cookie dough filling, and an irresistibly fluffy cream cheese–buttercream frosting tinted the perfect shade of blue. Every bite feels like a playful hug, with melty chocolate chips weaving through layers and those expressive cheesecake eyes bringing it all to life. Let me take you through this delightful dessert journey that’s as fun to make as it is to eat!
Ingredients You’ll Need
To make the Cookie Monster Cake Recipe, you’ll gather some familiar yet essential ingredients, each thoughtfully included to create a balance of tender crumb, creamy filling, and delightful texture. From silky butter and fresh cream cheese to the mini chocolate chips that add that perfect chocolatey surprise, every ingredient has its starring role.
- Cake flour: Provides a light, tender crumb that is perfect for soft cake layers.
- Baking powder and baking soda: Work together to give your cake the right rise and fluffiness.
- Salt: Enhances and balances all the sweet flavors beautifully.
- Unsalted butter (for cake and filling): Adds rich creaminess and moisture throughout the cake.
- Granulated sugar and brown sugar: Sweeten the cake and cookie dough filling with the perfect blend of caramel notes.
- Egg whites: Lighten the cake while helping hold it together for a delicate texture.
- Sour cream: Brings moisture and a subtle tang that adds depth to the cake layers.
- Pure vanilla extract: Infuses warmth and enhances every bite with its sweet aroma.
- Milk: Balances the batter for smooth consistency and helps mingle flavors.
- Mini chocolate chips: The star in both the cake and cookie dough, these give you delightful melty bites.
- Instant espresso powder: Intensifies the chocolate flavor without an overt coffee taste.
- All-purpose flour (for cookie dough filling): Gives structure to the buttery, sweet cookie dough.
- Cream cheese (for buttercream and cheesecake eyes): Adds tangy richness and silky texture to frostings and decorative eyes.
- Confectioners’ sugar: For the sweetest, smoothest cream cheese–buttercream frosting.
- Heavy cream: Lightens and fluffs the buttercream without losing richness.
- Unflavored gelatin powder: Stabilizes the frosting for perfect piping and durability.
- Blue and black gel food coloring: Bring Cookie Monster to vibrant life with his iconic blue fur and quirky eyes.
- White chocolate and corn syrup: Combine for shiny, smooth coatings on the cheesecake eyes.
- Chocolate chip cookies: Used around the cake’s mouth to complete that classic Cookie Monster look.
How to Make Cookie Monster Cake Recipe
Step 1: Prepare the Cake Batter
Start by stirring the instant espresso powder into the room temperature milk until all the grains dissolve—this deepens the chocolate flavor in the cake without adding any coffee bitterness, a clever little trick that adds complexity. Then whisk together your dry ingredients: cake flour, baking powder, baking soda, and salt, so they’re evenly combined. In a mixer bowl, beat the softened butter and sugar on medium speed until pale and fluffy, which traps air for a light crumb. Add the egg whites, sour cream, vanilla extract, and your espresso-infused milk, mixing gently but thoroughly. Finally, add the dry mix in two parts, folding carefully before folding in the mini chocolate chips, which will add surprise bursts of chocolate throughout the cake.
Step 2: Bake the Cake Layers
Divide the batter evenly into prepared pans and smooth the tops with a spatula. Bake at 350°F for about 25 to 28 minutes, or until a toothpick inserted in the center comes out clean. It’s important not to overbake so your cake remains tender and moist. Once baked, let the layers cool in their pans for 15 minutes before transferring them to wire racks to cool completely. This resting time helps the cake set perfectly for stacking later.
Step 3: Make the Cookie Dough Filling
While the cakes are baking and cooling, prepare the luscious cookie dough filling by beating softened butter with brown and granulated sugar until smooth. Mix in milk, then gradually add the flour until the dough comes together into a soft mass. The mini chocolate chips folded in at the end bring the filling its cookie magic. Chill the dough for at least 30 minutes so it firms up and is easier to spread between your cake layers.
Step 4: Create the Cheesecake Eyes
In a bowl, beat softened cream cheese with sugar until silky, then mix in an egg yolk and vanilla for flavor and structure. Spoon the mixture into silicone molds or create discs on parchment paper, and freeze for 30 minutes to firm them completely. This chilling is key to successfully dipping the eyes in melted white chocolate mixed with corn syrup for that glossy finish. After dipping, let them set in the fridge and carefully add off-center pupils with black gel food coloring—giving those iconic googly Cookie Monster eyes.
Step 5: Prepare the Blue Cream Cheese–Buttercream Frosting
Sprinkle gelatin over cold water and let it bloom for 5 minutes, then warm briefly until liquid. Beat softened cream cheese with butter until smooth, slowly add confectioners’ sugar then incorporate gelatin mixture, heavy cream, vanilla, and salt. This frosting is whipped high for a light yet stable texture, perfect for piping Cookie Monster’s furry coat. Reserve some plain white frosting for a crumb coat or accent areas on the cake.
Step 6: Assemble the Cake
Level your cake layers by trimming domes off the top for stability and a neat stack. Place the first layer cut side up on your board and spread a thick, even circle of cookie dough filling, making sure to leave an edge to keep it neat. Add the second cake layer cut side down and chill to set the filling. Next, apply a thin white crumb coat all over to trap crumbs before hitting the fridge again for a short chill.
Step 7: Pipe the Blue Fur
Mix blue gel food coloring into the remaining frosting, adjusting for the perfect Sesame Street blue. Using a piping bag with a grass tip, create short, upright strands of frosting all over the cake to imitate Cookie Monster’s fur. It’s a methodical but satisfying step that brings so much character and texture to the cake’s appearance.
Step 8: Add Finishing Touches
Press your shiny cheesecake eyes into the top center, then arrange chocolate chip cookies around the mouth area, completing the hallmark Cookie Monster grin. Refrigerate the whole cake for at least 30 minutes so everything sets firmly before serving. This final step really lets the cake’s personality shine through.
How to Serve Cookie Monster Cake Recipe
Garnishes
The magic of the Cookie Monster Cake Recipe finishes with those playful garnishes that make it instantly recognizable and fun. The oversized chocolate chip cookies serve as a perfect mimic of his favorite snack, creating a whimsical mouth, while the cheesecake eyes add character and charm, drawing smiles from every guest.
Side Dishes
This cake is a star on its own, but you can pair it with simple vanilla or chocolate ice cream for a creamy contrast or some fresh berries to brighten the palate. Lightly brewed coffee or a glass of cold milk also complement the cake’s rich, chocolatey, and tangy flavors perfectly, making those moments at the table warm and inviting.
Creative Ways to Present
Hosting a kids’ party or just want to wow your loved ones? Serve this cake on a bright blue or white cake stand to mimic Cookie Monster’s world. You can even sprinkle extra mini chocolate chips or cookie crumbs on the plate for extra fun. For an interactive twist, set out mini cookies so guests can “feed” Cookie Monster as they enjoy the cake!
Make Ahead and Storage
Storing Leftovers
Wrap leftover cake tightly in plastic wrap and store it in the refrigerator. The cake will stay moist and flavorful for up to 3 days, while the frosting holds up beautifully. Keep it chilled to maintain the cream cheese and cookie dough filling’s freshness.
Freezing
This Cookie Monster Cake Recipe freezes wonderfully. Wrap the whole cake or individual slices carefully in plastic wrap and then aluminum foil to avoid freezer burn. Freeze for up to 2 months. When ready to enjoy, thaw overnight in the fridge to preserve texture and flavor.
Reheating
Bring refrigerated or thawed cake slices to room temperature before serving by leaving them out for about 30 minutes. Avoid microwaving as the frosting could melt and the cake texture may change. The natural softness and creaminess of the cake are best appreciated when gently warmed through by time.
FAQs
Can I use regular chocolate chips instead of mini chocolate chips?
Absolutely! Regular chocolate chips will work fine, but mini chocolate chips distribute more evenly throughout the batter and filling, giving you consistent little bursts of chocolate in every bite.
Is there a substitute for the sour cream in the cake batter?
You can use an equal amount of plain Greek yogurt or buttermilk as a substitute. They provide similar moisture and a slight tang that keeps the cake tender and flavorful.
Do I have to make the cheesecake eyes? Can I use another decoration?
The cheesecake eyes add a unique, playful touch to really bring Cookie Monster to life, but if you’re short on time, edible googly eyes or candy eyes from the store are good alternatives.
How long should I chill the assembled cake before serving?
Once fully decorated, chilling the cake for 30 minutes to an hour helps the frosting set nicely and makes slicing cleaner and easier.
Can I make this cake vegan or dairy-free?
This recipe relies heavily on dairy and eggs for texture and flavor, so adapting it to vegan or dairy-free versions would require significant substitutions. You’d want to experiment with replacements like vegan butter, plant-based cream cheese, and egg replacers, but the texture and flavor might differ.
Final Thoughts
There’s nothing quite like the joy of making and sharing this Cookie Monster Cake Recipe with friends and family, especially when you see their faces light up as they dive into the soft cake, creamy cookie dough filling, and fluffy blue frosting. It’s a cake that brings fun, flavor, and a little bit of childhood magic to any celebration. I promise once you try this recipe, it will become your go-to when you want a dessert that’s playful, nostalgic, and absolutely delicious.
Print
Cookie Monster Cake Recipe
- Prep Time: 45 minutes
- Cook Time: 30 minutes
- Total Time: 1 hour 27 minutes
- Yield: 14 servings
- Category: Dessert
- Method: Baking
- Cuisine: American
Description
The Cookie Monster Cake is a playful, fun dessert inspired by the iconic Sesame Street character. Featuring moist vanilla-chocolate chip cake layers enveloped in rich cream cheese buttercream tinted in Cookie Monster’s signature blue, the cake is filled with a soft chocolate chip cookie dough and decorated with homemade cheesecake eyes and chocolate chip cookies for an irresistible, whimsical treat perfect for parties or any special occasion.
Ingredients
Cake Batter
- 2½ cups cake flour
- 2 teaspoons baking powder
- ½ teaspoon baking soda
- 1 teaspoon salt
- ¾ cup unsalted butter, softened
- 1¾ cups granulated sugar
- 5 large egg whites, room temperature
- ½ cup sour cream, room temperature
- 1 tablespoon pure vanilla extract
- ¾ cup milk, room temperature
- 1 teaspoon instant espresso powder
- 1 cup mini chocolate chips
Cookie Dough Filling
- ½ cup unsalted butter, softened
- ½ cup brown sugar, packed
- ¼ cup granulated sugar
- 1 tablespoon milk
- 1 cup all-purpose flour
- 1 cup mini chocolate chips
Cream Cheese–Buttercream Frosting
- 1 cup cream cheese, softened
- 1½ cups unsalted butter, softened
- 6 cups confectioners’ sugar
- ⅓ cup heavy cream
- 1 teaspoon pure vanilla extract
- 1/8 teaspoon salt
- 1 tablespoon unflavored gelatin powder
- ¼ cup cold water
- blue gel food coloring
- black gel food coloring
Cheesecake Eyes
- 8 ounces cream cheese, softened
- ¼ cup granulated sugar
- 1 egg yolk
- ½ teaspoon pure vanilla extract
- 6 ounces white chocolate, chopped
- 1 teaspoon corn syrup
- black gel food coloring
Garnish
- 8 to 10 chocolate chip cookies
Instructions
- Prepare the espresso milk mixture: Stir espresso powder into room temperature milk until fully dissolved, setting it aside to enhance the chocolate depth of the cake without graininess.
- Make the cake batter and bake: In a large bowl, whisk together cake flour, baking powder, baking soda, and salt. In a separate mixing bowl, beat softened butter and granulated sugar on medium speed for about 2 minutes until pale and light. Add egg whites, sour cream, vanilla extract, and the espresso-milk mixture, beating just until combined. Gradually mix in dry ingredients in two batches on low speed, scraping the bowl between additions. Fold in mini chocolate chips. Divide batter evenly into prepared cake pans, smooth tops, and bake at 350°F (177°C) for 25–28 minutes until a toothpick comes out clean. Cool in pans 15 minutes, then transfer to racks to cool completely.
- Prepare the cookie dough filling: Beat softened butter, brown sugar, and granulated sugar together until smooth. Mix in milk, then flour until a soft dough forms. Fold in mini chocolate chips. Cover and chill dough for about 30 minutes until firm.
- Prepare the cheesecake eyes: Beat cream cheese and granulated sugar until smooth. Mix in egg yolk and vanilla until combined. Portion mixture into two 1½-inch silicone molds or shape small discs on parchment. Freeze 30 minutes. Melt white chocolate and corn syrup in microwave in short bursts until smooth. Dip frozen discs in melted chocolate, allow excess to drip off, set on parchment. Chill 15 minutes until set. Use black gel food coloring to pipe off-center pupils.
- Prepare gelatin for frosting: Sprinkle gelatin powder over cold water, let stand 5 minutes. Microwave ~10 seconds until liquid.
- Make the cream cheese buttercream: Beat softened cream cheese and unsalted butter until smooth. Gradually beat in confectioners’ sugar on low speed until incorporated. Add cooled gelatin liquid, heavy cream, vanilla extract, and salt, then beat on high for 3 minutes until fluffy. Reserve ¾ cup white frosting uncolored.
- Level cake layers: Using a serrated knife, trim the domed tops of cooled cake layers to create flat surfaces for stable stacking and centered filling.
- Assemble the cake: Place the first cake layer cut side up on a cake board. Spread chilled cookie dough filling evenly in the center, leaving a ½-inch border. Top with second cake layer cut side down. Chill 15 minutes to set filling.
- Add crumb coat: Apply a thin layer of uncolored white buttercream over the top and sides of the cake to lock in crumbs. Chill for 20 minutes.
- Decorate with blue frosting fur: Tint remaining buttercream with blue gel food coloring to achieve the Sesame Street blue tone. Fit piping bag with grass piping tip (#233), fill with blue frosting. Pipe short vertical strands evenly around the cake to mimic fur texture.
- Add eyes and cookies: Press the cheesecake eyes onto the top center for googly eyeballs. Arrange chocolate chip cookies around the mouth area for authentic decoration.
- Chill and serve: Refrigerate cake for 30 minutes to set decorations. Remove 30 minutes before serving to bring to room temperature. Slice thinly to yield 14–16 servings.
Notes
- Room temperature ingredients ensure even mixing and smooth batter consistency.
- Using instant espresso powder enhances chocolate flavor without bitterness.
- Chilling cookie dough filling and cream cheese eyes is crucial for firm structure during assembly.
- Leveling the cake layers prevents uneven stacking and keeps the filling contained.
- Let cake sit at room temperature before serving for best texture and flavor.
- Blue gel food coloring is preferred for vibrant color without altering frosting texture.
- Store any leftovers covered in the refrigerator for up to 3 days.


