
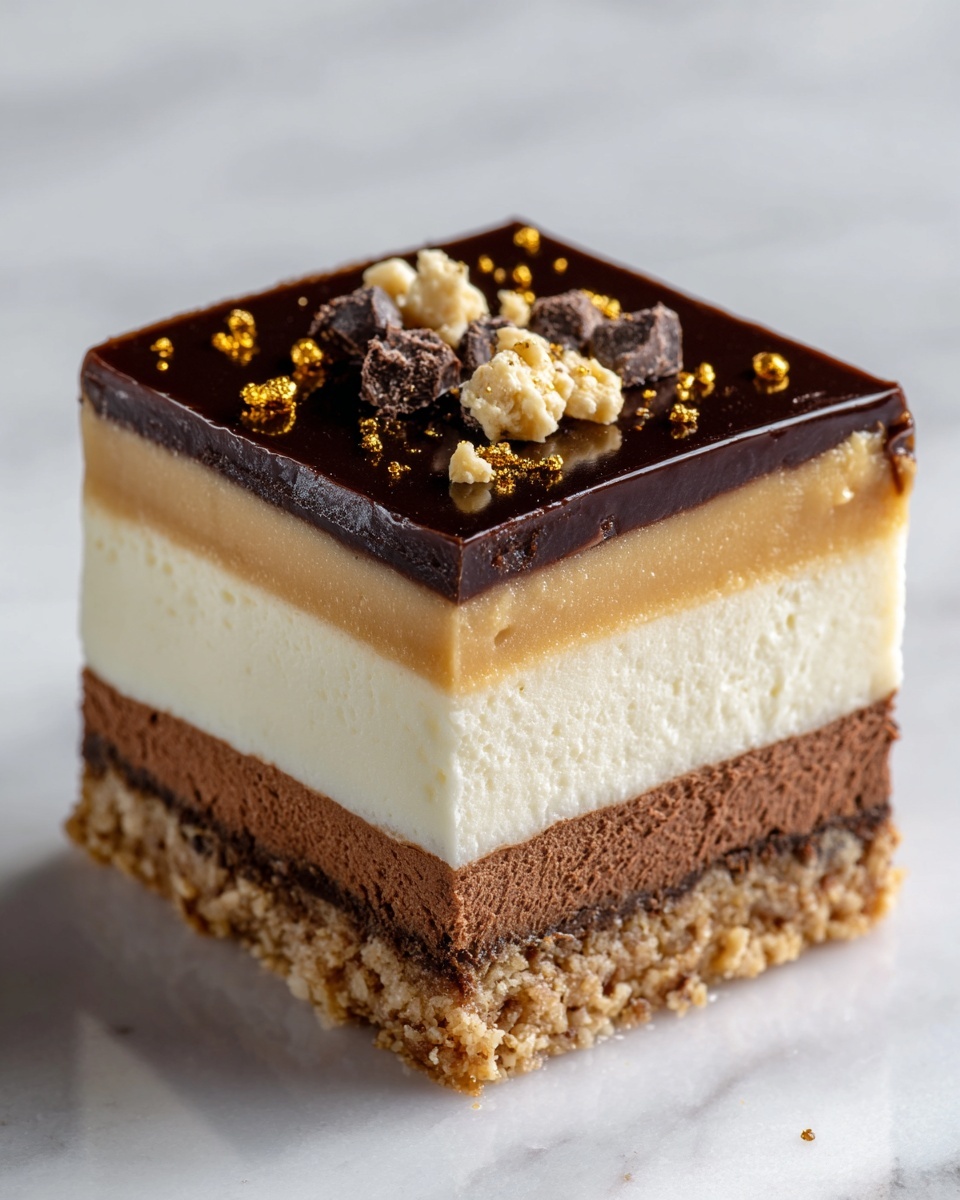
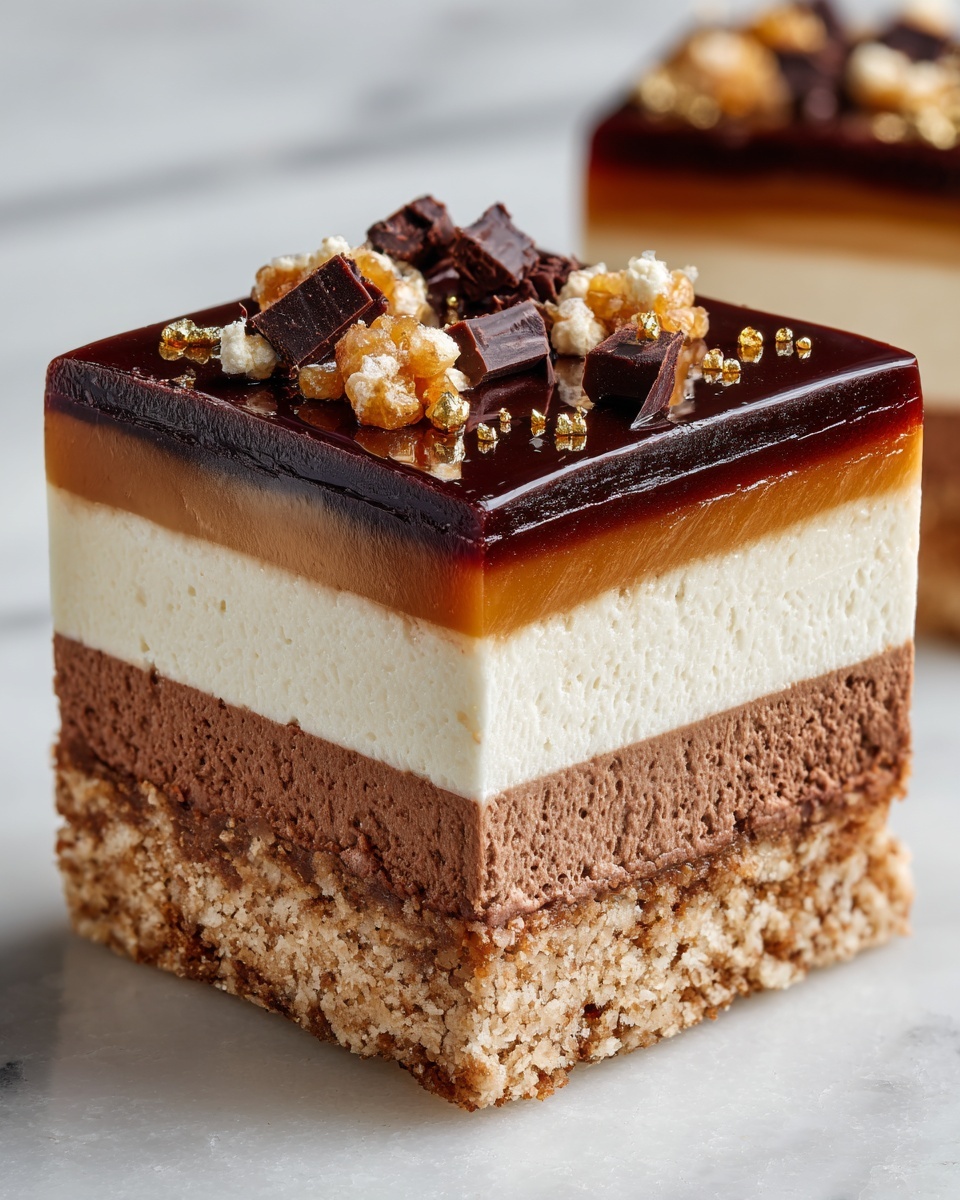
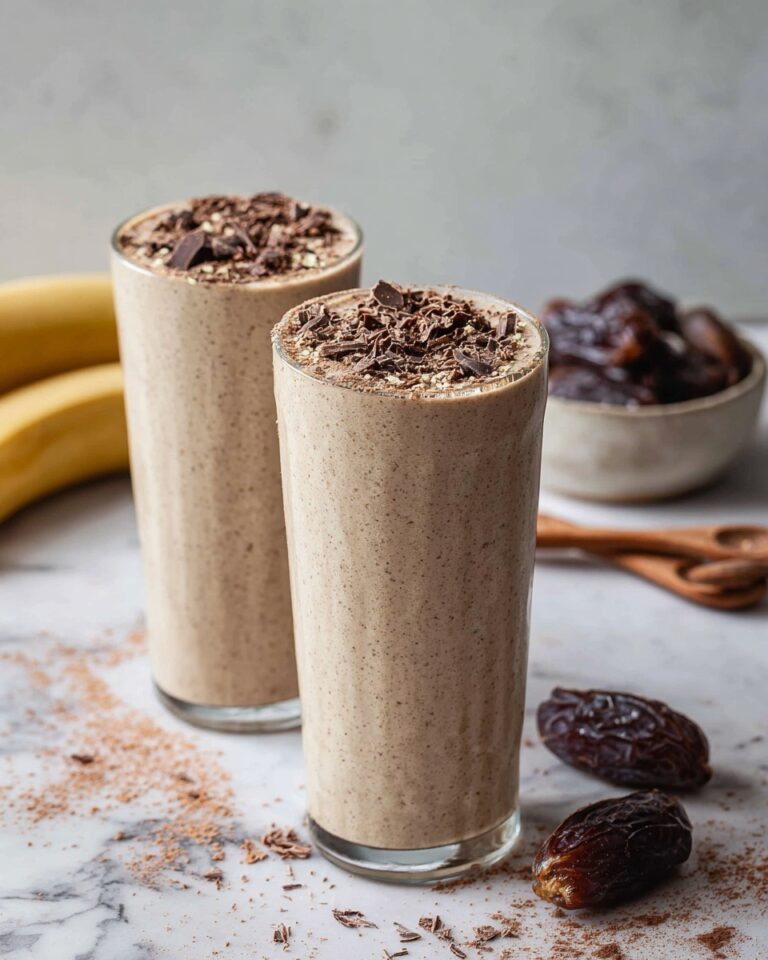
If you have a sweet tooth and love the rich combination of caramel, chocolate, and creamy cheesecake, then you are in for a treat with this Homemade No-Bake Twix Cheesecake Recipe. It captures all the best elements of a classic Twix bar in a luscious, no-bake dessert that’s surprisingly simple to put together. Each bite offers a layered experience with a buttery graham cracker crust, a silky chocolate layer, a fluffy cream cheese filling, and a decadent caramel topping that feels like pure magic. Trust me, once you try this recipe, it will quickly become your go-to indulgence for special occasions or anytime you want to impress friends and family with minimal fuss.
Ingredients You’ll Need
This Homemade No-Bake Twix Cheesecake Recipe relies on a handful of straightforward, pantry-friendly ingredients that come together to create something truly spectacular. Each component plays a vital role, balancing texture and flavors perfectly to achieve that authentic Twix-inspired dessert.
- 2 cups graham cracker crumbs: The base that adds a buttery crunch and sturdy foundation for your cheesecake layers.
- 1/2 cup melted butter: Binds the graham crackers into the perfect crust while adding richness.
- 1 cup chocolate chips: Essential for the rich, smooth chocolate layer and topping drip.
- 1/2 cup heavy cream: Helps melt the chocolate to a silky consistency for the topping and filling integration.
- 2 cups cream cheese, softened: The star ingredient of the cheesecake layer, lending a creamy, tangy base.
- 1/2 cup powdered sugar: Sweetens the cream cheese filling just enough without overpowering.
- 1 tsp vanilla extract: Enhances all the flavors with its warm, aromatic notes.
- 1 cup caramel sauce: Mimics the luscious caramel in Twix bars, dripping with that sticky-sweet goodness.
- 1 cup whipped cream: Folded into the cheesecake filling to add a light, airy texture that feels just heavenly.
How to Make Homemade No-Bake Twix Cheesecake Recipe
Step 1: Make the Crust
Start by combining the graham cracker crumbs and melted butter in a mixing bowl until everything is evenly coated and crumbly. Press this mixture firmly into the bottom of a springform pan to create an even, compact crust. Refrigerate it for about 10 minutes to help it set, which is key for a solid base that holds your layers perfectly.
Step 2: Prepare the Chocolate Layer
In a microwave-safe bowl, combine the chocolate chips and heavy cream. Heat this mixture in 20-second intervals, stirring after each, until the chocolate melts smoothly and blends well with the cream. Pour this luscious chocolate mixture over your chilled crust, spreading it evenly with a spatula. Pop it back into the fridge for 15 to 20 minutes so the chocolate firms up into a firm, glossy layer.
Step 3: Make the Cheesecake Filling
Next, beat the softened cream cheese, powdered sugar, and vanilla extract together in a large bowl until completely smooth and creamy. This is where that tangy, dreamy cheesecake flavor really starts to shine. Gently fold in the whipped cream to incorporate airiness, giving your filling a divine, fluffy texture that balances out the richness of the other layers.
Step 4: Assemble the Layers
Now it’s time to bring the whole dessert together. Spoon the cheesecake filling carefully over the firm chocolate layer and spread it evenly so it covers every inch. Drizzle the caramel sauce generously on top, then smooth it out gently with your spatula to create that iconic sticky caramel finish that’s synonymous with Twix.
Step 5: Final Chocolate Drizzle
If you want to add a little extra chocolate flair, melt another portion of chocolate chips with a bit of heavy cream for a final drizzle. Pour this sauce artistically over the caramel layer, letting some chocolate drip down the sides for a stunning visual and taste contrast. This final touch elevates your Homemade No-Bake Twix Cheesecake Recipe to a showstopper dessert.
Step 6: Chill and Serve
The wait is almost over! Refrigerate your cheesecake for at least 4 hours or until it is completely set. This chilling time helps all those layers meld together into one irresistible treat. When ready, slice into generous portions and watch your guests’ faces light up as they experience the perfect harmony of crunchy, creamy, chocolatey, and caramel flavors.
How to Serve Homemade No-Bake Twix Cheesecake Recipe
Garnishes
Although this cheesecake shines on its own, a few thoughtful garnishes can take it over the top. Try sprinkling crushed Twix bars, a pinch of sea salt to enhance the caramel, or fresh berries for a pop of color and brightness. Each garnish adds a fun twist that makes serving this dessert even more special.
Side Dishes
You don’t need much else alongside this decadent treat, but a scoop of vanilla bean ice cream or a dollop of extra whipped cream can offer a cool, creamy contrast. If you want to keep things light, a simple fresh fruit salad with citrus notes is a refreshing counterpoint to the rich flavors of the cheesecake.
Creative Ways to Present
Presentation is part of the fun! Consider serving slices on elegant dessert plates drizzled with extra caramel and chocolate sauces. You can also set up a cheesecake bar where guests add their own toppings like nuts, chocolate shavings, or caramel popcorn. For parties, try making mini versions in individual jars or cups — equally delicious and ultra Instagram-worthy!
Make Ahead and Storage
Storing Leftovers
Leftover Homemade No-Bake Twix Cheesecake Recipe keeps beautifully in the fridge for up to 4 days. Keep it tightly covered with plastic wrap or in an airtight container to maintain freshness and prevent the cheesecake from absorbing other fridge odors.
Freezing
If you want to make this dessert ahead of time or simply have leftovers that need a longer shelf life, freezing is a great option. Wrap it securely in plastic wrap and then in foil before freezing for up to 1 month. When you’re ready to enjoy it again, thaw overnight in the fridge to preserve the layers’ perfect texture.
Reheating
Because this is a no-bake cheesecake, reheating is not recommended as it can affect the texture and melt the layers. It’s best enjoyed chilled to fully appreciate the creamy and firm layers working together.
FAQs
Can I use a different type of cookie for the crust?
Absolutely! While graham cracker crumbs are traditional and give a buttery, slightly sweet crunch, you can experiment with digestive biscuits, chocolate cookies, or even crushed pretzels for a salty-sweet twist. Just adjust the amount of butter accordingly to get the right crust texture.
Do I have to use a springform pan?
A springform pan makes it easiest to remove the cheesecake without damaging the layers, but if you don’t have one, any pan with removable sides will do. Just be gentle when serving to keep the layers intact.
Is this recipe nut-free?
Yes, this Homemade No-Bake Twix Cheesecake Recipe is naturally nut-free, but be sure to check your caramel sauce and chocolate chips labels if you have severe allergies, as some brands process nuts.
Can I substitute cream cheese with a dairy-free alternative?
You can try using a dairy-free cream cheese substitute to make this recipe vegan or lactose-free. The texture and flavor might vary slightly, but it’s a great way to enjoy this dessert if you have dietary restrictions.
How long does it take to set properly in the fridge?
Plan on at least 4 hours for the cheesecake to fully set and the layers to firm up nicely. For the best texture, chilling overnight is even better and helps the flavors meld beautifully.
Final Thoughts
Making this Homemade No-Bake Twix Cheesecake Recipe is like bringing a piece of candy bar heaven onto your dessert table, without the hassle of baking. It’s rich, creamy, and layered with the perfect balance of flavors and textures that’ll have everyone asking for seconds. Give it a try—you’ll be amazed at how effortless and rewarding it is to create such a crowd-pleaser at home!
Print
Homemade No-Bake Twix Cheesecake Recipe
- Prep Time: 15 minutes
- Cook Time: 5 minutes
- Total Time: 4 hours 20 minutes
- Yield: 8 servings
- Category: Dessert
- Method: No-Cook
- Cuisine: American
Description
This Homemade No-Bake Twix Cheesecake is a decadent dessert featuring a crunchy graham cracker crust, a smooth chocolate layer, creamy cheesecake filling, and a luscious caramel topping. Perfect for chocolate and caramel lovers, this no-bake treat comes together quickly and requires just chilling to set, making it an effortless yet indulgent dessert for any occasion.
Ingredients
Crust
- 2 cups graham cracker crumbs
- 1/2 cup melted butter
Chocolate Layer
- 1 cup chocolate chips
- 1/2 cup heavy cream
Cheesecake Filling
- 2 cups cream cheese, softened
- 1/2 cup powdered sugar
- 1 tsp vanilla extract
- 1 cup whipped cream
Topping
- 1 cup caramel sauce
- Additional chocolate chips and heavy cream for final drizzle (optional)
Instructions
- Make the Crust: In a mixing bowl, combine the graham cracker crumbs and melted butter until well mixed. Press the mixture firmly into the bottom of a springform pan to create the crust layer. Refrigerate for 10 minutes to set.
- Prepare the Chocolate Layer: In a microwave-safe bowl, combine chocolate chips and heavy cream. Microwave in 20-second intervals, stirring each time until smooth. Pour this chocolate mixture over the chilled crust and spread evenly. Place the pan back in the fridge for 15-20 minutes until the chocolate firms up.
- Make the Cheesecake Filling: In a large bowl, beat the softened cream cheese, powdered sugar, and vanilla extract until smooth and creamy. Gently fold in the whipped cream to add a light, airy texture.
- Assemble the Layers: Spoon the cheesecake filling over the chocolate layer, spreading it evenly. Pour caramel sauce on top, smoothing it out gently with a spatula.
- Final Chocolate Drizzle: Melt additional chocolate chips with a bit of heavy cream, if desired, for a final drizzle. Pour over the caramel layer, allowing some to drip down the sides.
- Chill and Serve: Refrigerate the cheesecake for at least 4 hours or until fully set. Slice and enjoy the delicious layers of chocolate, caramel, and creamy cheesecake!
Notes
- Use a springform pan for easy removal of the cheesecake.
- Make sure the cream cheese is softened for a smooth filling.
- Allow each layer to chill sufficiently to help the cheesecake set properly.
- The final chocolate drizzle is optional but adds an extra layer of flavor and presentation appeal.
- Store leftovers covered in the refrigerator and consume within 3 days.


